
Table of content
What will we create?
We are creating a REST API for a simple blog post that will serve blog posts and author information. You can implement this API with any front-end framework of your choice.

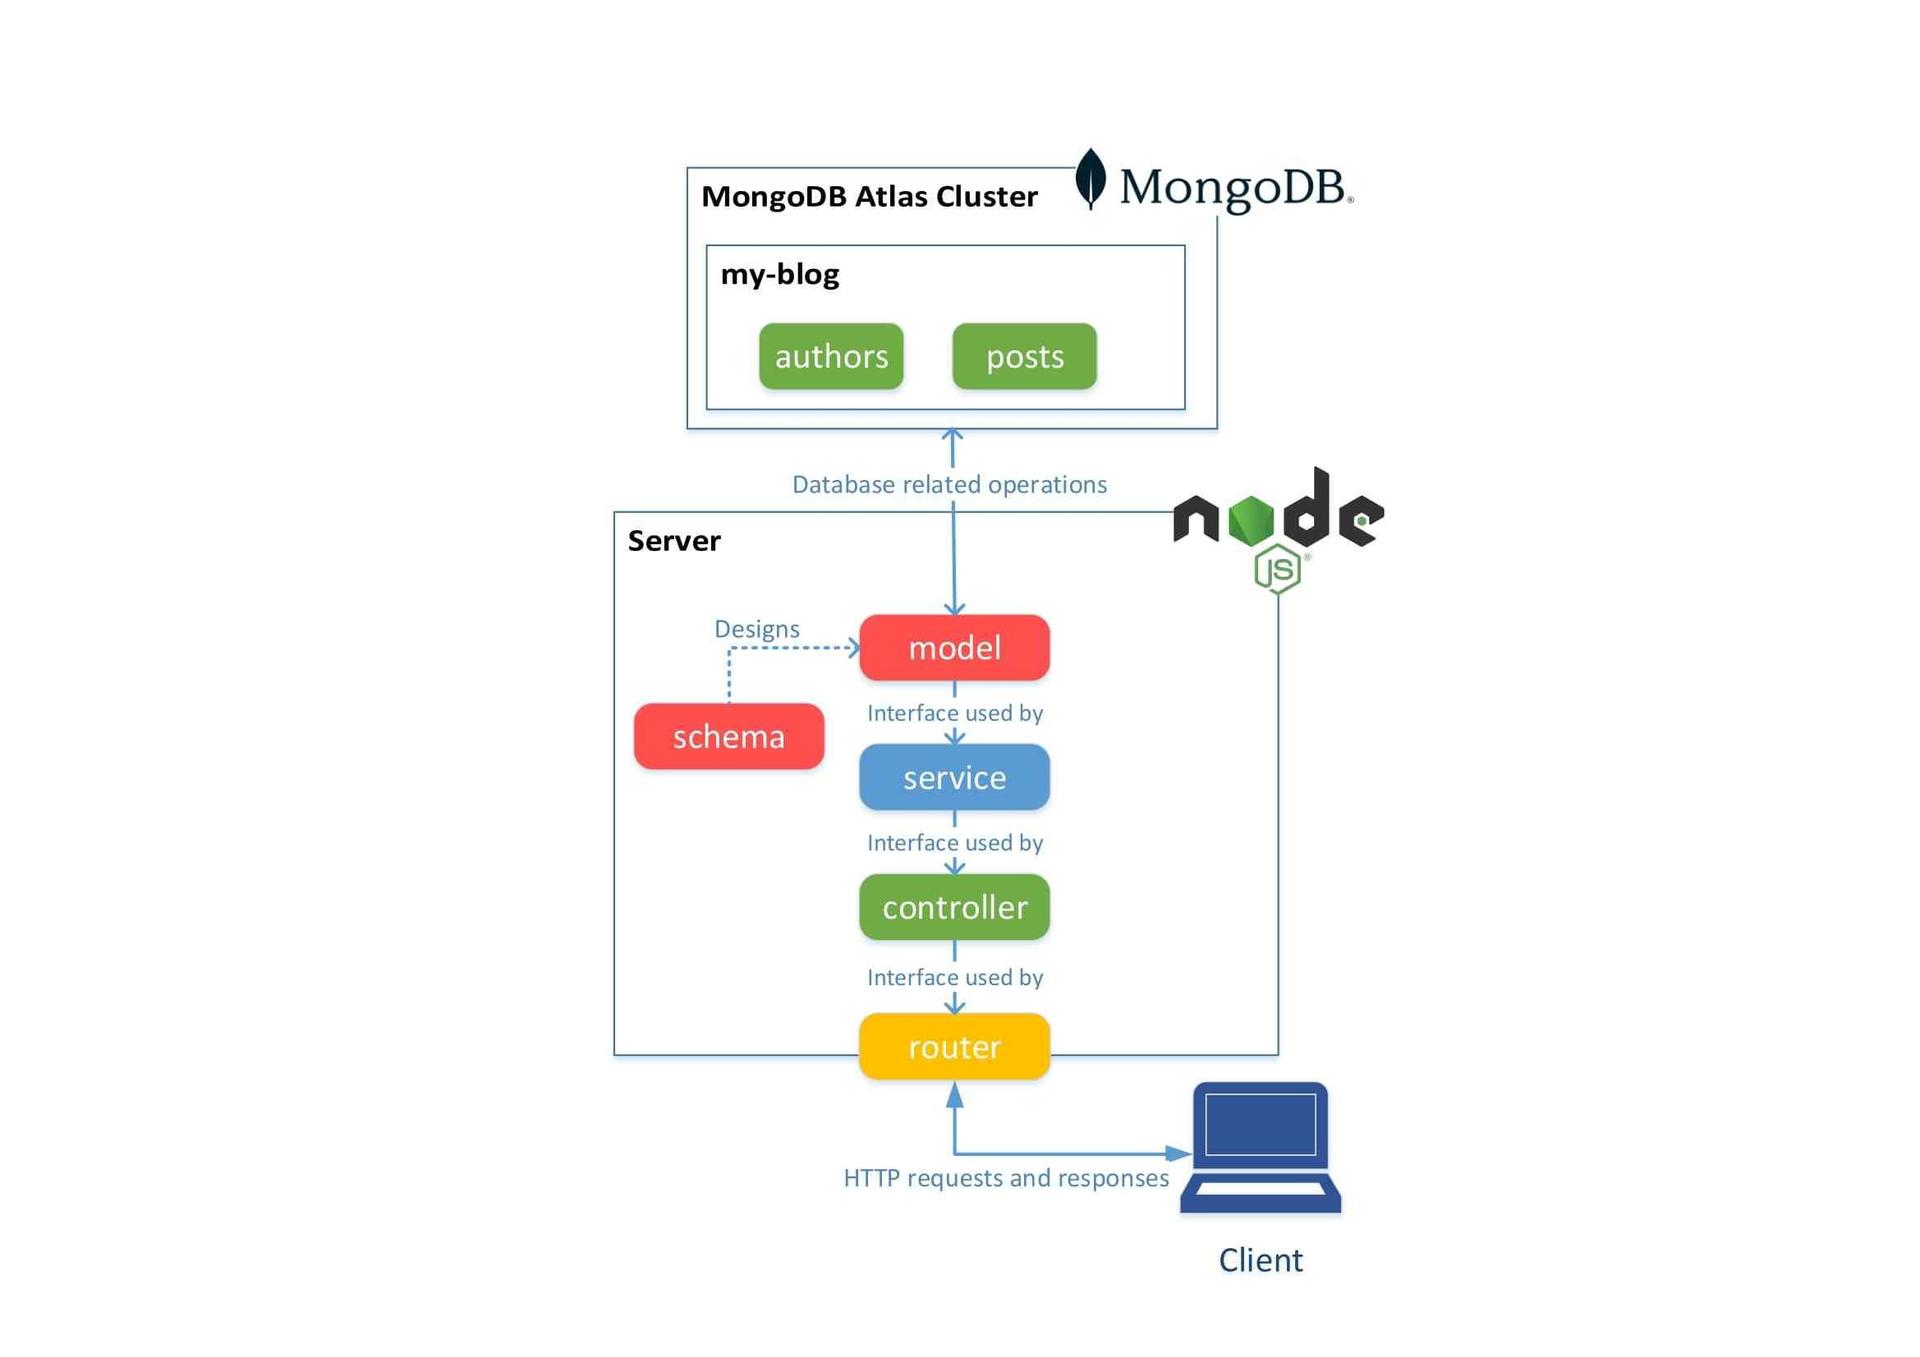
The REST API will have three layers.
- Schema: Describes the structure of the database.
- Service Layer: Describes business logic. How to access the database? How to process data from a database?
- Controller Layer: Handles HTTP requests and responses. Calls multiple services to complete the requested work.
Such a layered architecture supports Separation of concern where the layer has its responsibility. Such independence helps in the easy maintenance of the project.
We are using the following framework and tech in this project:
- Express.js: A Node.js framework that provides features to help build web applications.
- Mongoose: A MongoDB ORM for Node js. It makes working with the MongoDB database easier like: connecting to a database, translating JavaScript objects to MongoDB objects, schema validation, and more.
- dotenv: Helps to manage the app's configuration and environment.
- nodemon: A dev tool that will monitor changes in our app and restarts the app for us.
- Postman: A dev tool for testing the API app and its working. We will use this tool after project completion.
Setting up node and express
Initializing Node
- Create a project folder, navigate inside the folder, and open a terminal. It will be our project root.
- Initialize the node with the command:
npm initor use the commandnpm init -yto skip all questions asked during initialization. - It will create a
package.jsonfile in our project root. This file holds various metadata relevant to the project. This file will give information to npm that allows it to identify and handle the project's dependencies and scripts.
Installing dependencies
-
Install dependencies with the command:
npm install -save mongoose express dotenv -
Install dev dependencies with the command:
npm install --save-dev nodemon
Changing package.json
-
Create a file
server.js. Then makeserver.jsour app's entry point. Insidepackage.json, make the following changes:1// package.json 2{ 3 ... 4 "main": "server.js", 5 ... 6} -
Add the following script in
package.jsonto runserver.jsunder the monitoring of nodemon.1// package.json 2{ 3 ... 4 "scripts": { 5 ... 6 "server": "nodemon server" 7 }, 8 ... 9} -
package.jsonshould look something like this:1// package.json 2{ 3 "name": "your-project-name", 4 "version": "1.0.0", 5 "description": "", 6 "main": "server.js", 7 "scripts": { 8 "test": "echo \"Error: no test specified\" && exit 1", 9 "server": "nodemon server" 10 }, 11 "author": "", 12 "license": "ISC", 13 "dependencies": { 14 "dotenv": "^16.0.2", 15 "express": "^4.18.1", 16 "mongoose": "^6.5.4" 17 }, 18 "devDependencies": { 19 "nodemon": "^2.0.19" 20 } 21}
Setting .env file
-
If you are using git, don't forget your
.gitignorefile. Here is a.gitignoretemplate you can use for the node project. -
Create a
.envfile in the project root with the following config. This config will be accessible through the node process environment. It is where you keep all your private keys and settings. So, don't expose it publicly.1# .env 2PORT = 5000 -
In project root, create an
srcfolder. It is where we will keep all our source code. -
Inside the
srcfolder, create aconfig.jsfile with the following code:1// src/config.js 2// importing configurations from .env file 3require("dotenv").config(); 4 5// exporting config to use with our app 6module.exports = { 7 // parseInt converts string to integer with base 10 8 port: parseInt(process.env.PORT, 10) || 5000, 9};
Creating server app
-
In this code snippet, we are creating an express app and listening to port 5000 for our request.
1// server.js 2const express = require("express"); 3const config = require("./src/config"); 4// creating an express app 5const app = express(); 6 7// using express middleware to parse the incoming request body 8app.use(express.json()); 9app.use(express.urlencoded({ extended: false })); 10 11// exposing a 'get' method end-point for our client/end-user 12// In our final code, we will remove this part 13app.get("/api/v1/", (req, res) => { 14 //responding with status code and message 15 res.status(200).send({ message: "Everything is working" }); 16}); 17 18// listening at the port we have configured 19app.listen(config.port, () => { 20 console.log(`Server running at PORT:${config.port}`); 21}); -
The file structure looks like this:
1src/
2├─ config.js
3.env
4package.json
5server.js
Running server.js
-
Open terminal in our project root and run command
npm run server -
Just a tip, during our entire project series, run the server app to get immediate feedback from the console. It will be easier to detect any bug earlier in our project development.
-
Now open a browser and type this URL:
localhost:5000/api/v1/. Herelocalhost:5000is our hostname, and/api/v1/is an end-point that handles our get request. -
You will get a JSON response from our server.
Summary
- We initiated our project, did some configuration, and ran our server app.
- In the next part, we will connect to our MongoDB database and create some schema and model for our database.
- The link to the project repo is available here.