
Table of content
Postman
- We are using Postman, an API testing tool, to test the basic functioning of our API.
- You can download and use the free desktop app from here. Or, you can even try the web version (create an account to use the web version).
- For the desktop app, you can skip creating an account.
- After up and running our postman app, we can test different API endpoints.
Note: The Node.js project of the REST API should be up and running for REST API testing
Creating environment variables


Fig.1: Creating environment variables
- An environment holds project-specific variables and values. Variables can be server URL, authentication key, API key, etc.
- We can create different environments (test, development, and production) and easily switch between them in our project.
- Navigate to the Environments tab
- Select the + button on the left sidebar and create a new environment.
- Under VARIABLE, fill base as a variable name.
- Under TYPE, select default
- Under INITIAL VALUE and CURRENT VALUE, fill localhost:5000/api/v1. It is our server URL.
- Name the environment and save it. I will name it rest-api-with-node.
Creating a new collection

Fig.2: Creating a new collection
- Navigate to the Collections tab
- Select the + button on the left sidebar and create a new collection.
- Name the collection. I will name it rest-api-with-node.
- The sidebar will list your new collection.
- Hover over your collection name and select three horizontal dots to pop more options.
- Select Add folder and name it the author.
- Again add another folder under the collections and name it to post.
- These folders will hold requests for respective collections in our database.
- Don't forget to select the environment we created in the above section from the menu in the top right corner.
Testing APIs for author
Adding a new request
- Hover over the author folder and select three horizontal dots to pop more options.
- Select Add request option.
POST request for the author collection
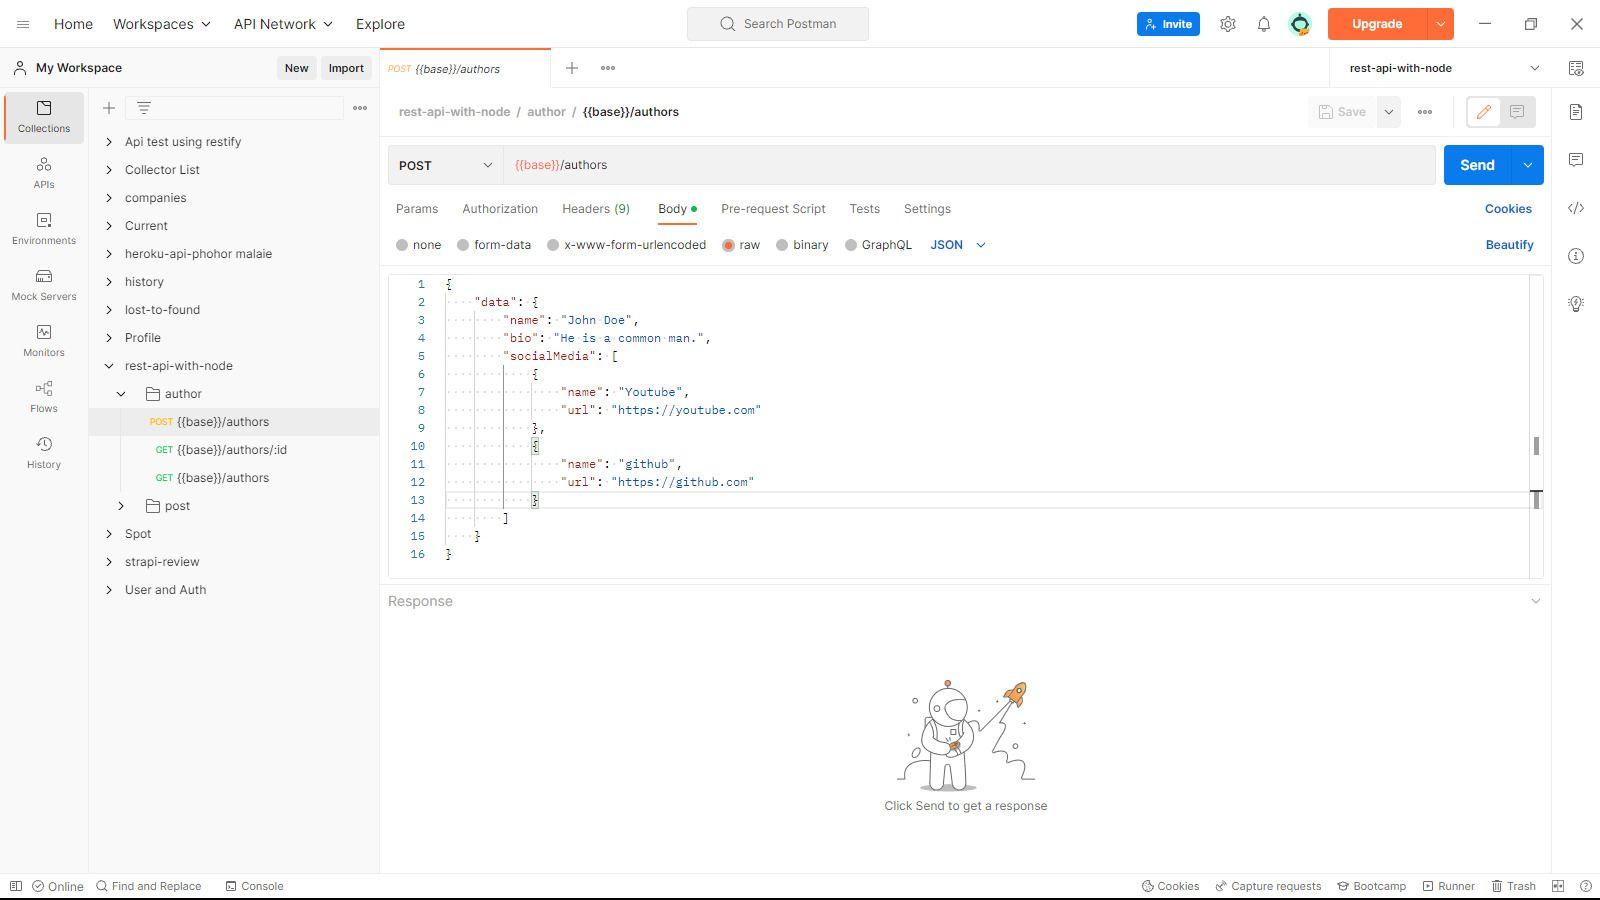
Fig.3: POST request for the author collection
- From the drop-down menu, select the POST option.
- Fill in the address bar with URL
{{base}}/authors. Here{{base}}will select variable from our environment. - Select the Body tab, raw option, and JSON type.
- Fill the text box below with the author's information in JSON format.
1{ 2 "data": { 3 "name": "John Doe", 4 "bio": "He is a common man.", 5 "socialMedia": [ 6 { 7 "name": "Youtube", 8 "url": "https://youtube.com" 9 }, 10 { 11 "name": "github", 12 "url": "https://github.com" 13 } 14 ] 15 } 16} - Hit Send button
- You will get a response in the Response section.
- Grab the
_idvalue from the response. It is a unique id for the author document (after we insert data to a MongoDB collection, we call it a document). We will use it during our other requests. - You can name the request and save it for future reference.
GET request for the author
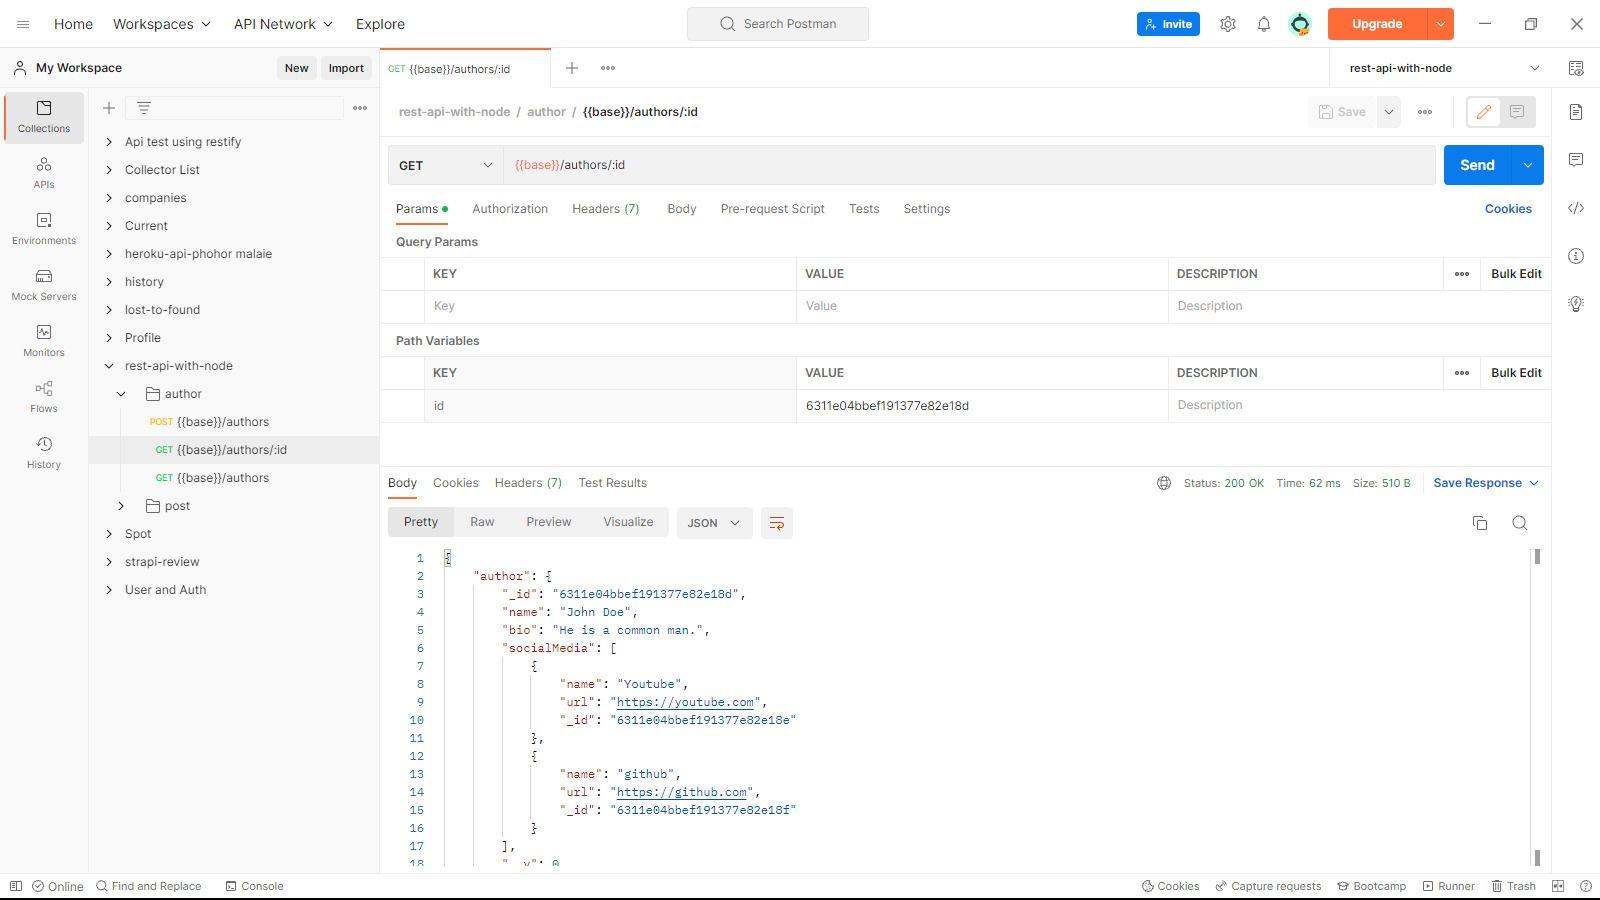
Fig.4: GET request for the author
- Add another request under the author folder.
- Select GET option
- Fill in the address bar with URL
{{base}}/authors/:id :idindicates path variable.- Under the Params tab, Path Variables heading, fill in the value of the id key with the
_idof the author we created in the above section. - Hit Send button
- We will get the author's information. There might be additional key-value pairs auto-generated by MongoDB.
GET request for multiple authors
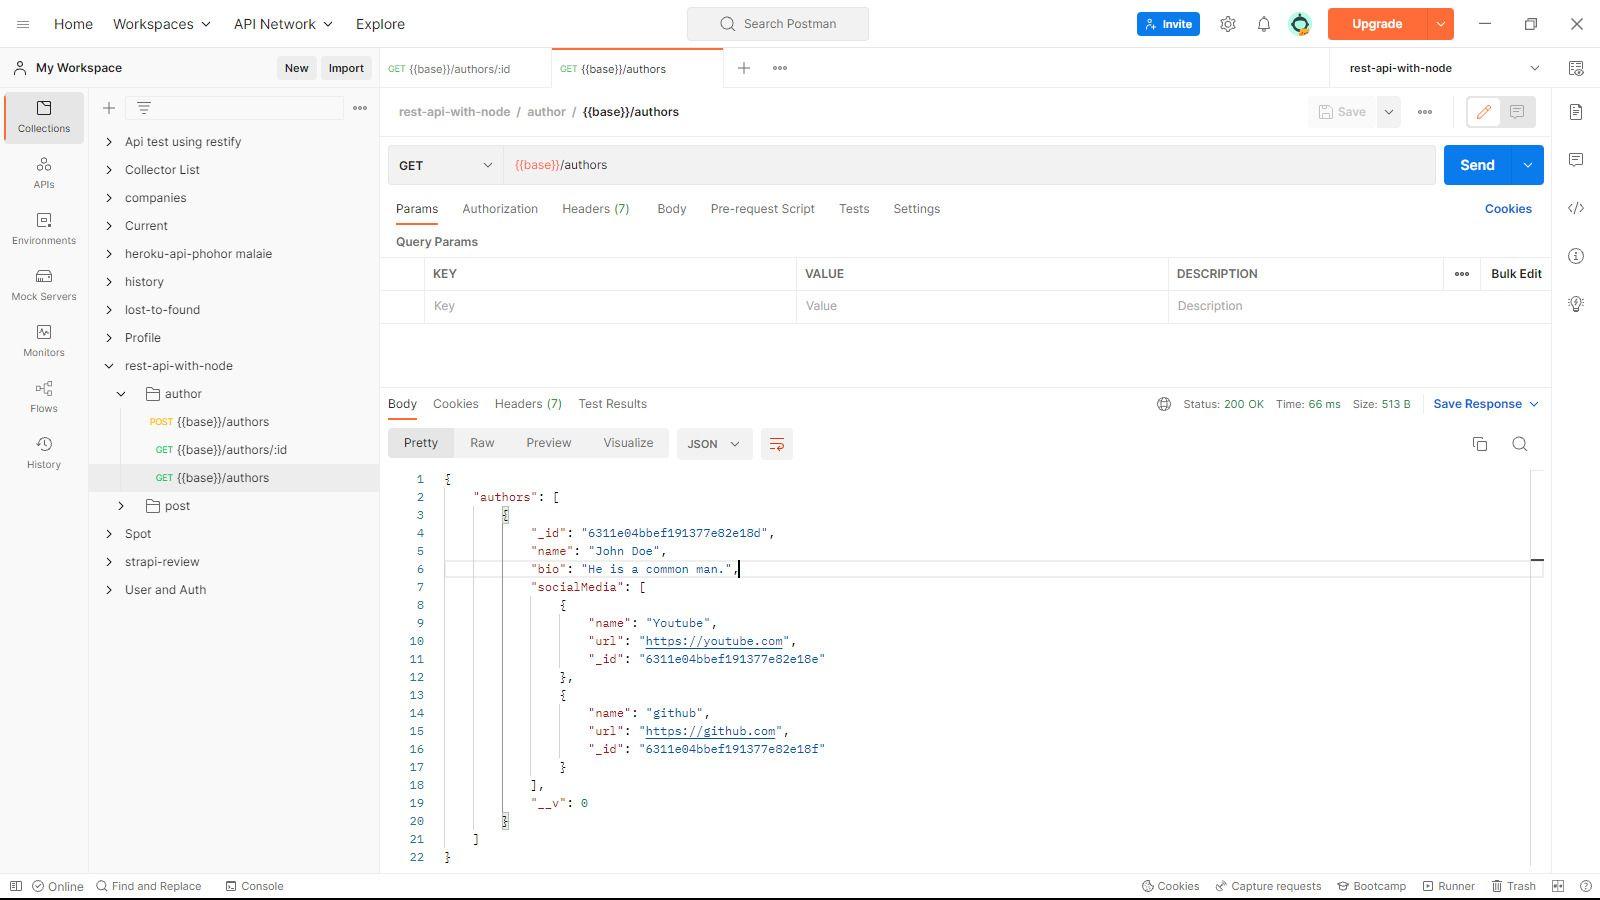
Fig.5: GET request for multiple authors
- Before creating this request, make sure you have added multiple authors.
- Add another request under the author folder.
- Select GET option
- Fill in the address bar with URL
{{base}}/authors - Hit Send button
- We will get an object with an array of authors.
Testing APIs for post
POST request for the post collection
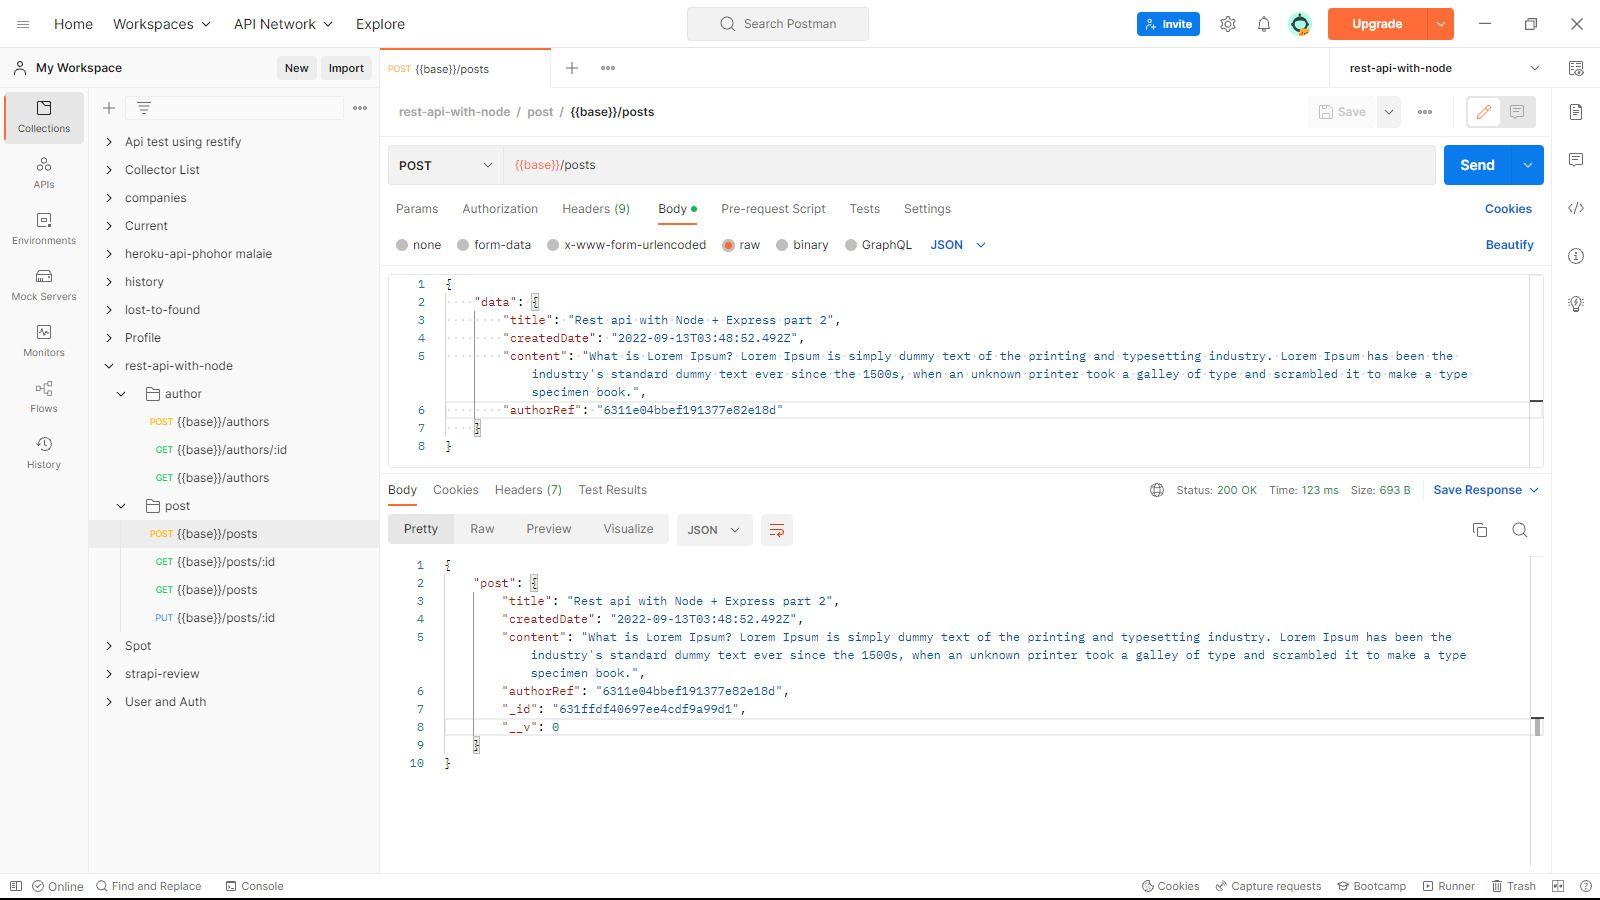
Fig.6: POST request for the post collection
- Add request under post folder
- From the drop-down menu, select the POST option
- Fill in the address bar with URL
{{base}}/posts. - Select the Body tab, raw option, and JSON type.
- Fill the text box below with the author's information in JSON format. Replace the
authorRefvalue with the_idof an author you created. It will refer to the author of the post.1{ 2 "data": { 3 "title": "Rest api with Node + Express", 4 "createdDate": "2022-09-02T13:02:41.366Z", 5 "content": "What is Lorem Ipsum? Lorem Ipsum is simply dummy text of the printing and typesetting industry. Lorem Ipsum has been the industry's standard dummy text ever since the 1500s, when an unknown printer took a galley of type and scrambled it to make a type specimen book.", 6 "authorRef": "<author _id>" 7 } 8} - Hit Send button
- Grab the
_idvalue of the post from the response.
GET request for the post
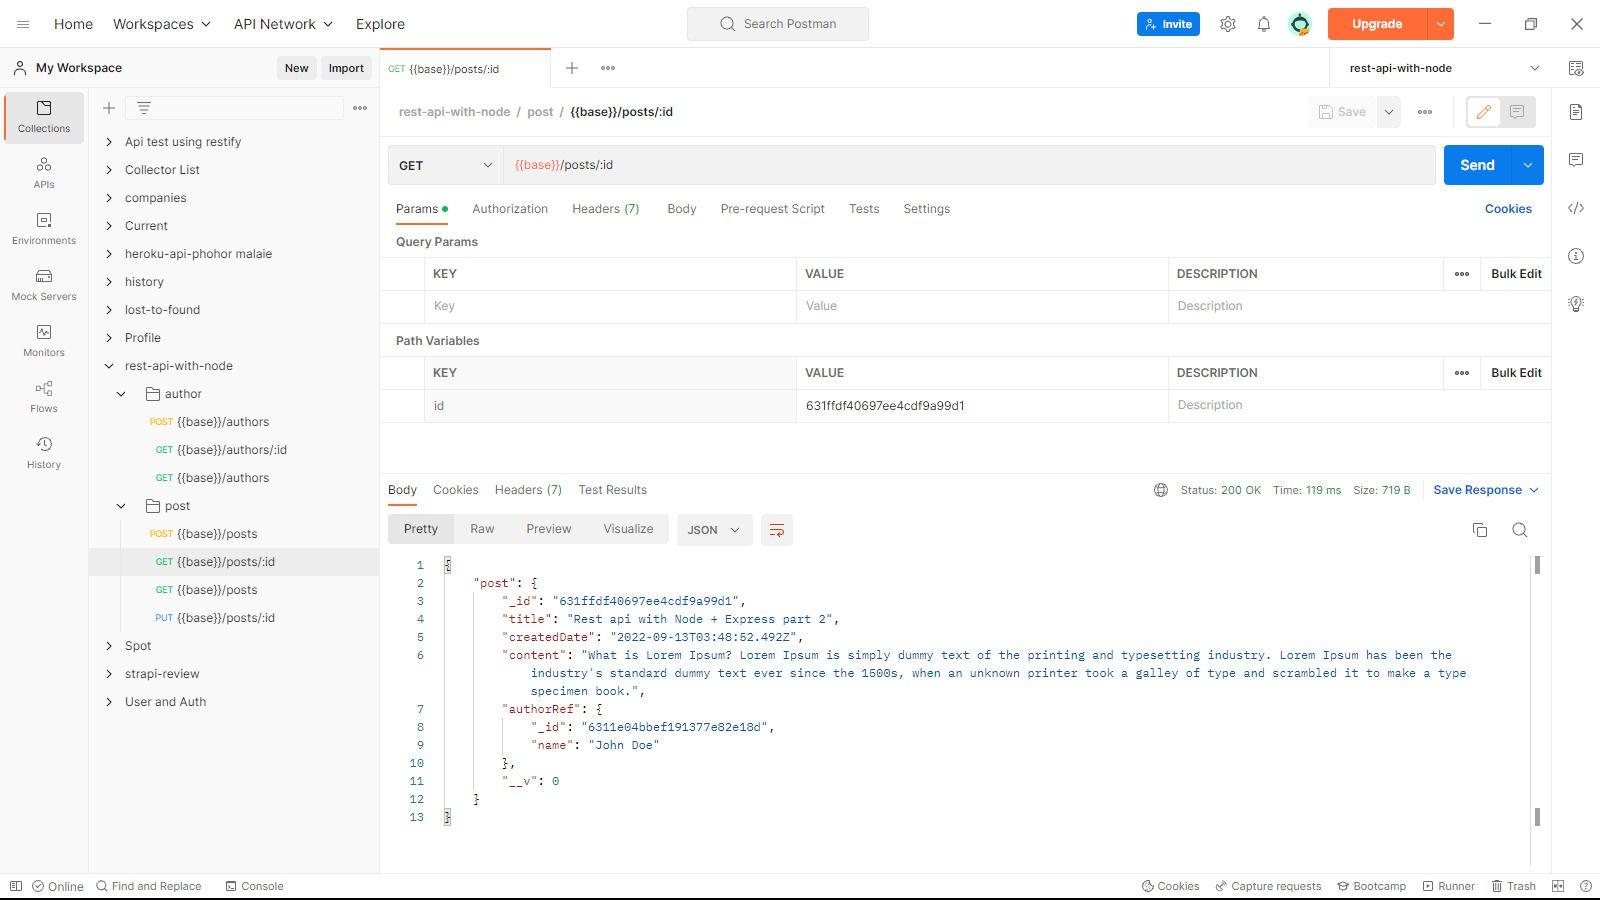
Fig.7: GET request for the post
- Add another request under the post folder
- Select GET option
- Fill in the address bar with URL
{{base}}/posts/:id - Under the Params tab, Path Variables heading, fill in the value of the id key with the
_idof the post we created in the above section. - Hit Send button
- We will get the post we have created. We will also get the author's information under the
authorRefkey.
GET request for multiple posts
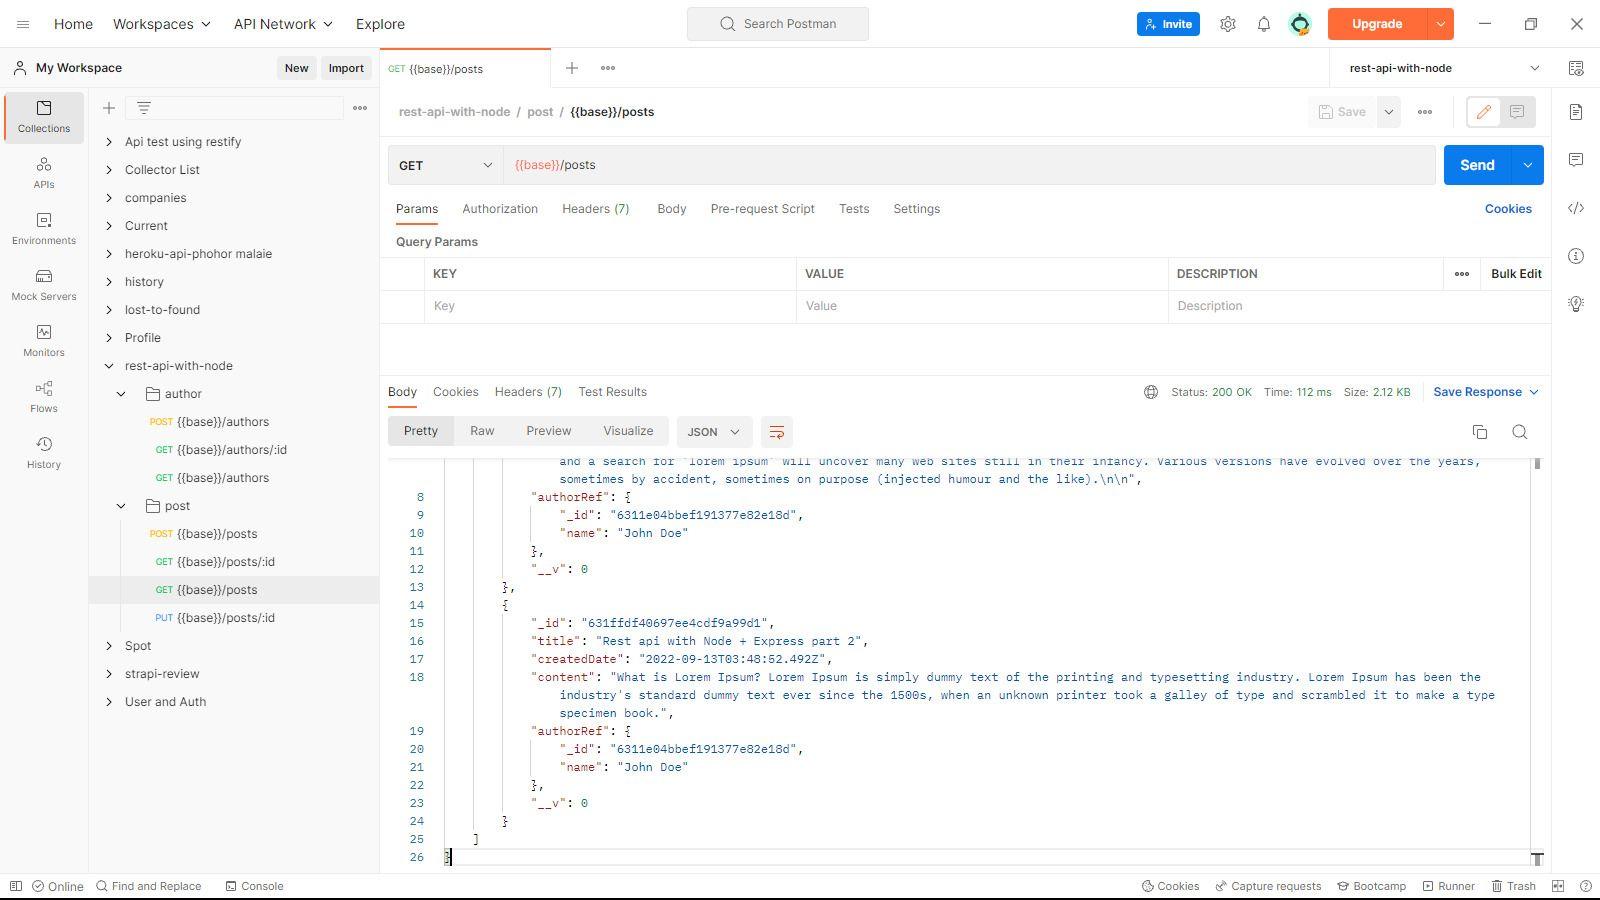
Fig.8: GET request for multiple posts
- Before creating this request, make sure you have created multiple posts.
- Add another request under the post folder.
- Select GET option
- Fill in the address bar with URL
{{base}}/posts - Hit Send button
- We will get an object with an array of posts.
PUT request for the post
- Add another request under the post folder
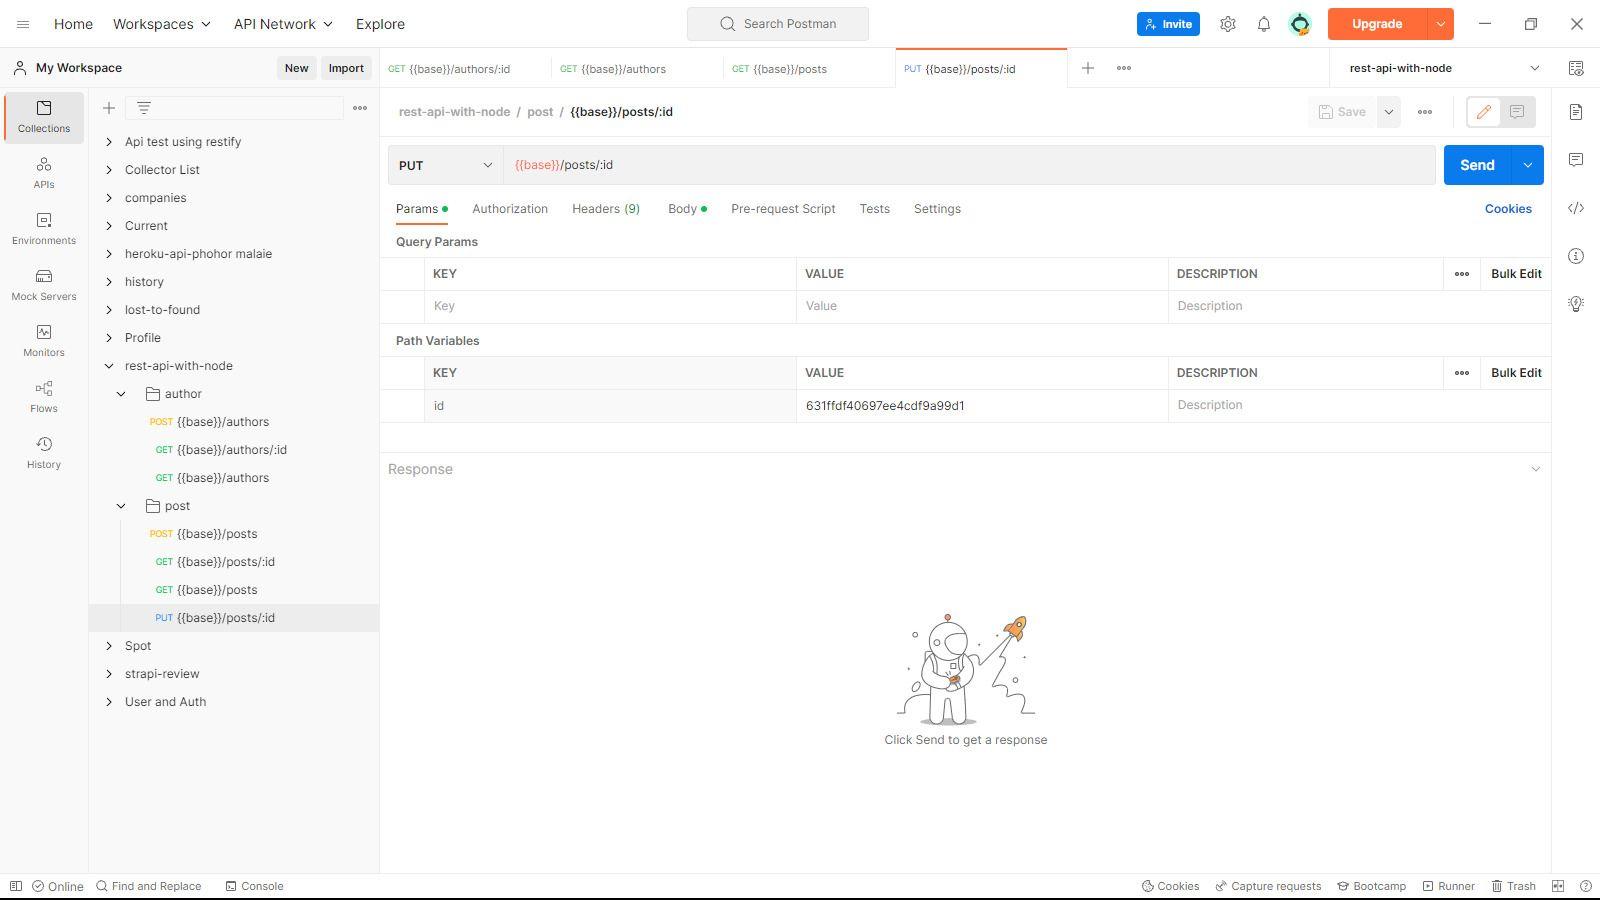
Fig.9: PUT request for the post - params tab
- Select PUT option
- Fill in the address bar with URL
{{base}}/posts/:id - Under the Params tab, Path Variables heading, fill in the value of the id key with the
_idof the post we created in the above section.
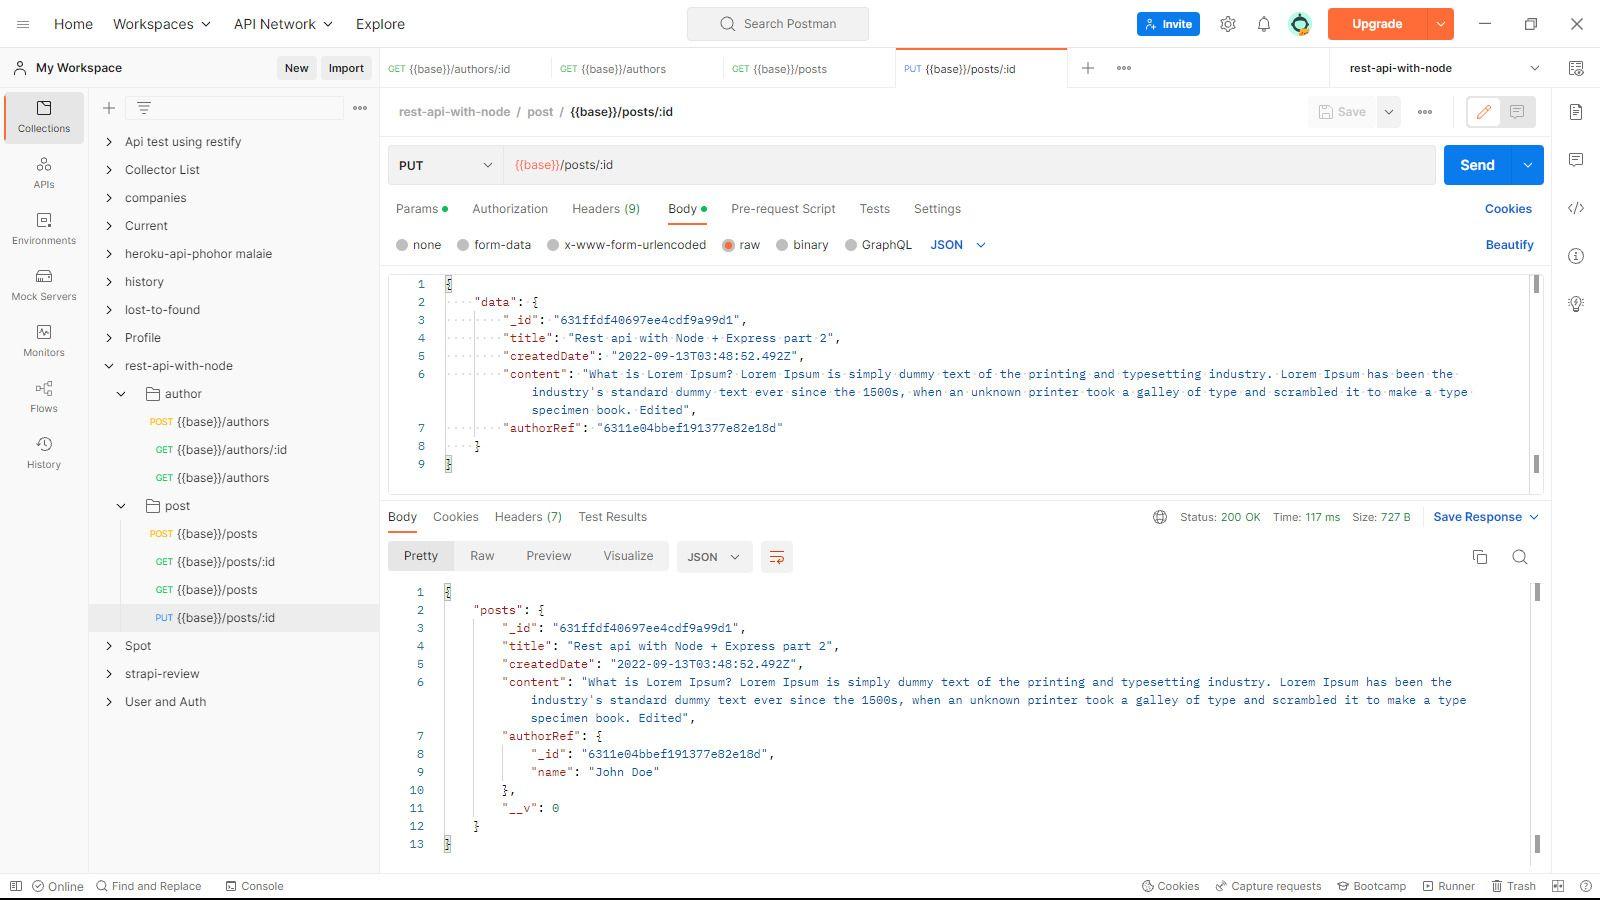
Fig.10: PUT request for the post - body tab
-
Navigate to the Body tab, select the raw option, JSON type, and fill in the updated data. Don't forget to replace
_idwith post_idandauthorRefwith your author_id.1{ 2 "data": { 3 "_id": "<Your post _id>", 4 "title": "Rest api with Node + Express part 2", 5 "createdDate": "2022-09-13T03:48:52.492Z", 6 "content": "What is Lorem Ipsum? Lorem Ipsum is simply dummy text of the printing and typesetting industry. Lorem Ipsum has been the industry's standard dummy text ever since the 1500s, when an unknown printer took a galley of type and scrambled it to make a type specimen book. Edited", 7 "authorRef": "<Your author _id>" 8 } 9} -
Hit Send button
-
We will get an updated post.
Wrapping up
This part wraps up the series. In this series, we build a REST API that servers blog posts using Node, Express.js, and MongoDB. We learn about Layered architecture and how each layer interacts with the other.
This project is for learning purposes only, so there are many limitations. The link to the project repo is available here.