Table of content
- Mapbox
- Next.js
- Initializing the map
- Adding styles
- Adding the map controls
- Loading the data
- Adding the custom markers
- Adding the marker popup
- Conclusion
Mapbox
At the time of writing this article, to use Google Maps API, you need billing information (even though it is free for certain limits). So, Mapbox can be a better alternative to Google Maps which provides, 50,000 free map loads for the web (without billing credentials). It provides a range of APIs, SDKs, and developer tools for maps, navigation, and search across platforms.
Setting up the Mapbox key
- Goto Mapbox and create an account or login if you have one.
- In your account dashboard, under Access tokens section, select Create a token button.
- In Create an access token page, name your token and hit Create token.
- While creating token you can also add different types of token restrictions and url restriction. But for current app we will simply use the default settings.
Next.js
In this article, we are using Next.js 13 for our app. We opted for App Router for our app instead of Page router. Thus, the src/app directory will contain our root route example.com/. The page.js file will define a unique page for each route, and the layout.js file will define the UI shared between multiple pages like navigation, header, and footer. We can also nest layouts.
But for simplicity, we will use the root route only. Thus, our initial file structure looks like this:
  src
  ├─ app/
  │  ├─ globals.css
  │  ├─ layout.js
  │  ├─ page.js
  package-lock.json
  package.json
Dependencies
In this app, we will use react-map-gl and react-icons. We will use the react-map-gl package to use Mapbox components in the Next.js app.
To install the dependencies run:
npm install react-map-gl react-icons --save
Adding key in Next.js environment
We will add the access token we created in the above section as an environment variable in our Next.js app. In your Next.js root folder, create a .env.local file (if you don't have one) and use the prefix NEXT_PUBLIC_ with the variable name.
# .env.local
NEXT_PUBLIC_MAPBOX_ACCESS_TOKEN=<Your_Mapbox_Access_Token>
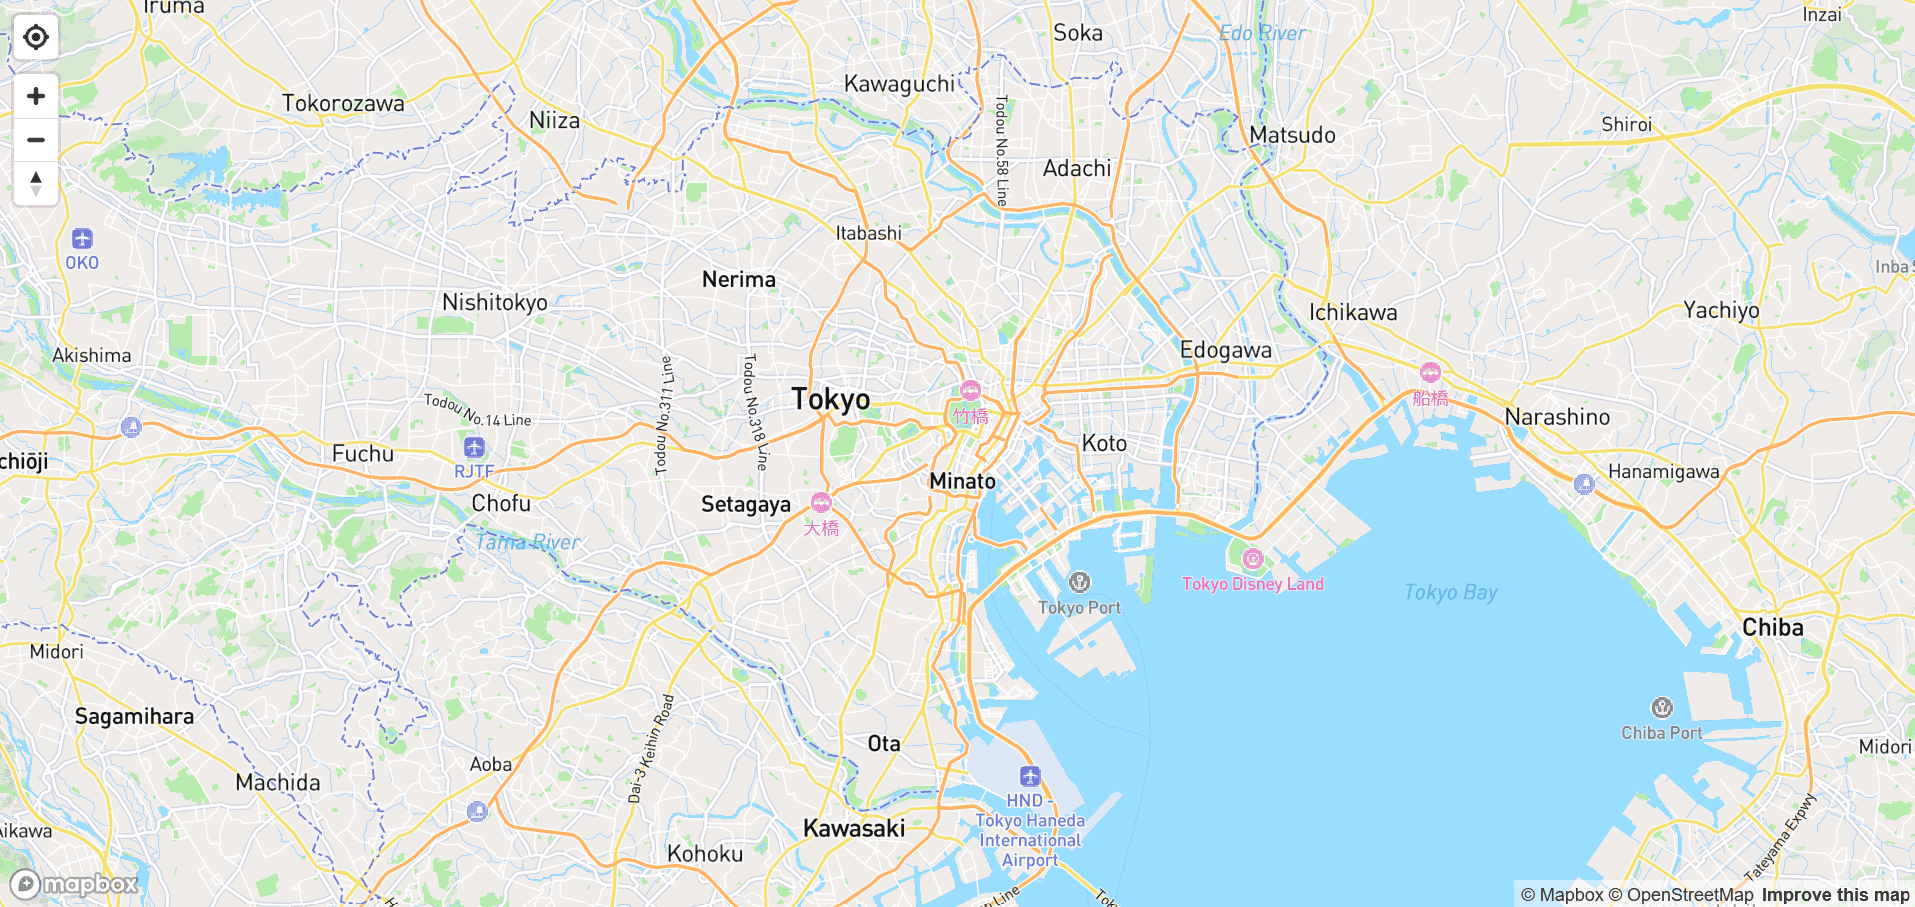
Initializing the map
In the page.js file, we will import the Map component from the react-map-gl package. The Map component will render the map. But first, we need to supply the following values to initialize the Map component:
- mapboxAccessToken: This attribute takes in the Mapbox access token that we had stored in the .env.local file. We can access this token using the
process.envglobal variable. - mapbox-gl.css: This file consists of all the styling for our Map component and its child elements. Failing to import this file will result in the inaccurate rendering of the Map component and its elements like Marker, Popup, Navigation Controls, etc.
- initialViewState: This attribute takes in the initial location (latitude, longitude, and zoom level). When the map first loads this location will be rendered.
1// page.js
2"use client";
3
4import Map from "react-map-gl";
5import "mapbox-gl/dist/mapbox-gl.css";
6
7import classes from "./Page.module.css";
8
9export default function Home() {
10	const mapboxToken = process.env.NEXT_PUBLIC_MAPBOX_ACCESS_TOKEN;
11
12	return (
13		<main className={classes.mainStyle}>
14			<Map
15				mapboxAccessToken={mapboxToken}
16				mapStyle="mapbox://styles/mapbox/streets-v12"
17				style={classes.mapStyle}
18				initialViewState={{ latitude: 35.668641, longitude: 139.750567, zoom: 10 }}
19				maxZoom={20}
20				minZoom={3}
21			></Map>
22		</main>
23	);
24}
Adding styles
In src/app/globals.css add the following style:
1/* globals.css */
2
3body {
4	font-family: Arial, Helvetica, sans-serif;
5}
6/* Overrides the original padding of the Popup component in the Map */
7.mapboxgl-popup-content {
8	padding: 0 !important;
9}
Create a src/app/Page.module.css file and add the style for map components:
1/* Page.module.css */
2
3.mainStyle {
4	max-width: 100%;
5	height: 100vh;
6}
7.mapStyle {
8	width: 100%;
9	height: 100%;
10}
11.popupTitle {
12	background-color: #87bd41;
13	font-weight: 700;
14	font-size: medium;
15	color: ivory;
16	padding: 10px;
17}
18.popupInfo {
19	font-weight: 400;
20	font-size: 14px;
21	padding: 10px;
22}
23.popupLabel {
24	font-weight: bold;
25}
26.popupWebUrl {
27	color: dodgerblue;
28}
29.popupWebUrl:active,
30.popupWebUrl:focus {
31	outline: 0;
32}
Adding the map controls
The map controls generally include Navigation controls and Geo-location controls. Under Navigation controls, we get zoom-in, zoom-out, and compass controls. Under Geo-location controls, we get user location control.
1// page.js
2"use client";
3
4import Map, { NavigationControl, GeolocateControl } from "react-map-gl";
5import "mapbox-gl/dist/mapbox-gl.css";
6
7import classes from "./Page.module.css";
8
9export default function Home() {
10	const mapboxToken = process.env.NEXT_PUBLIC_MAPBOX_ACCESS_TOKEN;
11
12	return (
13		<main className={classes.mainStyle}>
14			<Map
15				mapboxAccessToken={mapboxToken}
16				mapStyle="mapbox://styles/mapbox/streets-v12"
17				style={classes.mapStyle}
18				initialViewState={{ latitude: 35.668641, longitude: 139.750567, zoom: 10 }}
19				maxZoom={20}
20				minZoom={3}
21			>
22				<GeolocateControl position="top-left" />
23				<NavigationControl position="top-left" />
24			</Map>
25		</main>
26	);
27}

Loading the data
For illustration, we will use some airport data. It is not structured in standard geospatial formats like GeoJSON, KML, OSM etc. It is represented in simple JSON format, but it works for now. In the project root, create a dummyData folder with the airports.json file. We are using partial data on airports in Japan, which is available here. You can get complete data from here.
Import by adding import airports from "../../dummyData/airports.json"; in import section of the page.js file. Our project structure will look like this:
  dummyData
  ├─ airports.json
  src
  ├─ app/
  │  ├─ globals.css
  │  ├─ layout.js
  │  ├─ page.js
  │  ├─ Page.module.css
  package-lock.json
  package.json
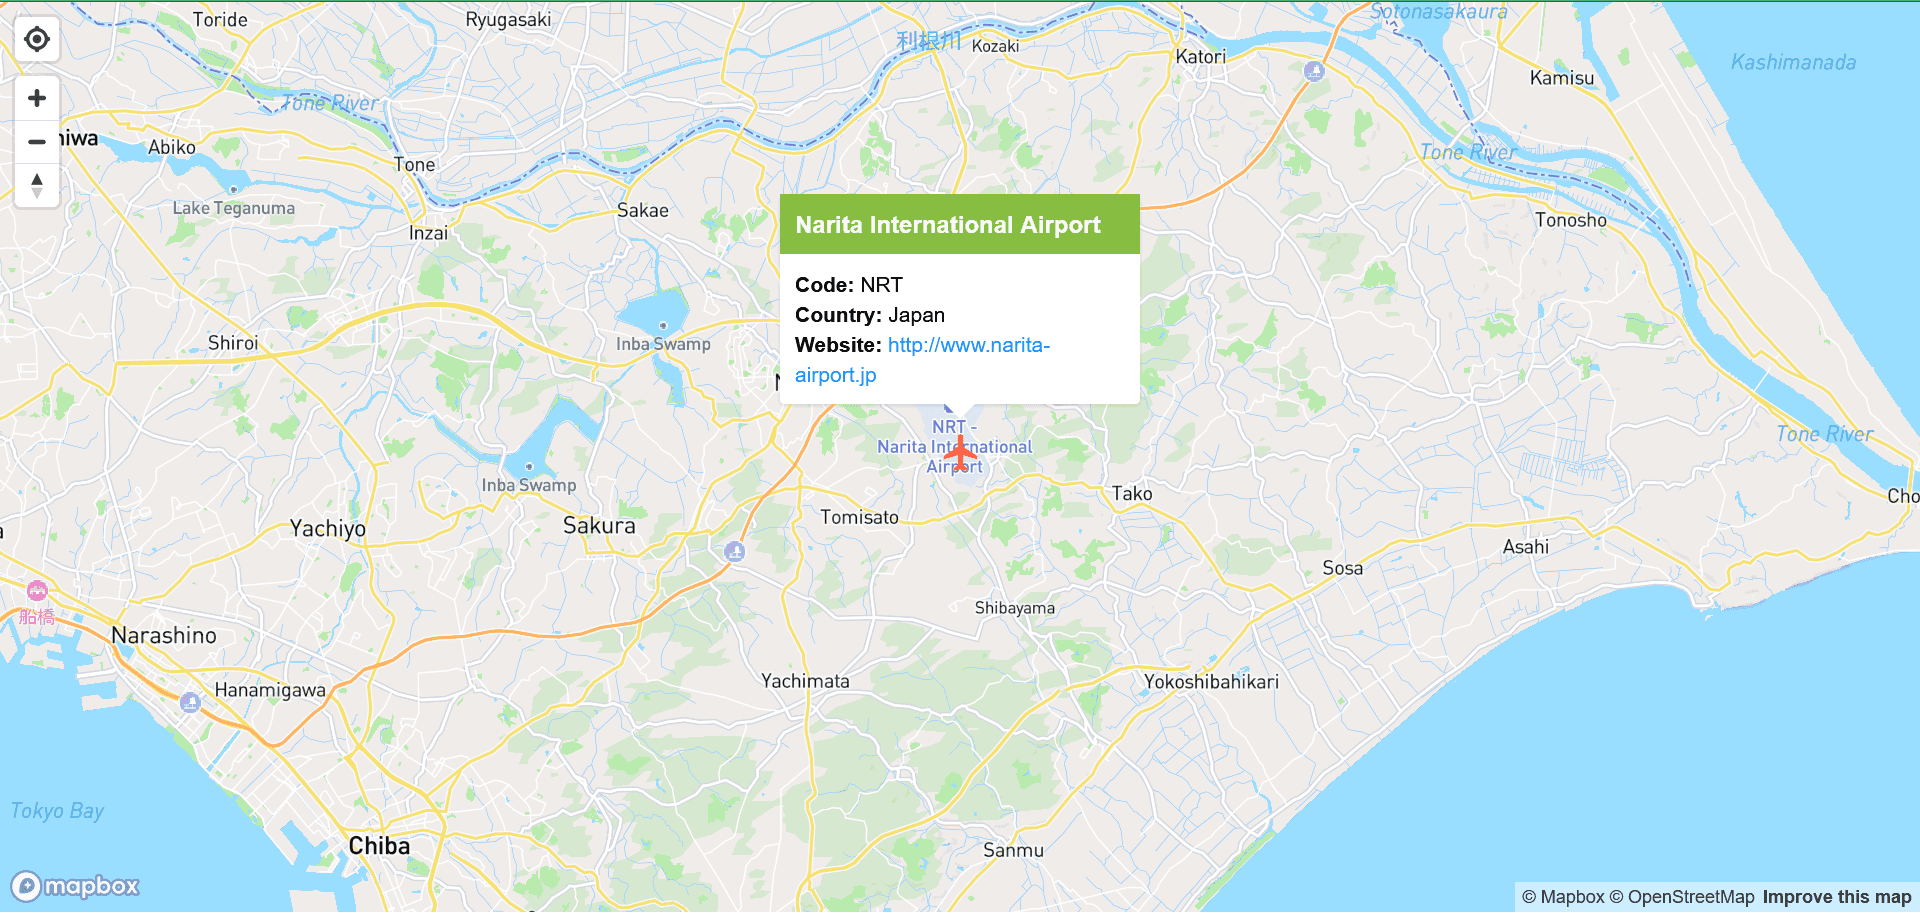
Adding the custom markers
We will use the Array.map() function to iterate through each airport's information from the airports.json file. In each iteration, we will return the Marker component from the react-map-gl package and each Marker will represent the airport data (point of interest) on the map.
To customize the map marker, we will provide icons from the react-icons package as button to the Marker component. The onClick() event on the button will set the selectedMarker state and add flyTo animation to the map. To animate the map, we will use the useRef React hook.
1// page.js
2"use client";
3import { useState, useRef } from "react";
4
5import Map, { Marker, Popup, NavigationControl, GeolocateControl } from "react-map-gl";
6import "mapbox-gl/dist/mapbox-gl.css";
7import { IoMdAirplane } from "react-icons/io";
8
9import airports from "../../dummyData/airports.json";
10import classes from "./Page.module.css";
11
12export default function Home() {
13	const mapboxToken = process.env.NEXT_PUBLIC_MAPBOX_ACCESS_TOKEN;
14	const [selectedMarker, setSelectedMarker] = useState(null);
15	const mapRef = useRef(null);
16
17	const zoomToSelectedLoc = (e, airport, index) => {
18		// stop event bubble-up which triggers unnecessary events
19		e.stopPropagation();
20		setSelectedMarker({ airport, index });
21		mapRef.current.flyTo({ center: [airport.lon, airport.lat], zoom: 10 });
22	};
23
24	return (
25		<main className={classes.mainStyle}>
26			<Map
27				ref={mapRef}
28				// attributes...
29			>
30				{/*Geolocate and Navigation controls...*/}
31
32				{airports.map((airport, index) => {
33					return (
34						<Marker key={index} longitude={airport.lon} latitude={airport.lat}>
35							<button
36								type="button"
37								className="cursor-pointer"
38								onClick={(e) => zoomToSelectedLoc(e, airport, index)}
39							>
40								{<IoMdAirplane size={30} color="tomato" />}
41							</button>
42						</Marker>
43					);
44				})}
45			</Map>
46		</main>
47	);
48}
Adding the marker popup
Marker popup can be useful to provide comprehensive information about the point of interest in our map. When a marker is selected, we will use React state to toggle the popup for that particular marker.
1// page.js
2"use client";
3import { useState, useRef } from "react";
4
5import Link from "next/link";
6
7import Map, { Marker, Popup, NavigationControl, GeolocateControl } from "react-map-gl";
8import "mapbox-gl/dist/mapbox-gl.css";
9import { IoMdAirplane } from "react-icons/io";
10
11import airports from "../../dummyData/airports.json";
12import classes from "./Page.module.css";
13export default function Home() {
14	// functions...
15
16	return (
17		<main className={classes.mainStyle}>
18			<Map
19			// attributes...
20			>
21				{/*Geolocate and Navigation controls...*/}
22				{/*Airport Markers...*/}
23
24				{selectedMarker ? (
25					<Popup
26						offset={25}
27						latitude={selectedMarker.airport.lat}
28						longitude={selectedMarker.airport.lon}
29						onClose={() => {
30							setSelectedMarker(null);
31						}}
32						closeButton={false}
33					>
34						<h3 className={classes.popupTitle}>{selectedMarker.airport.name}</h3>
35						<div className={classes.popupInfo}>
36							<label className={classes.popupLabel}>Code: </label>
37							<span>{selectedMarker.airport.code}</span>
38							<br />
39							<label className={classes.popupLabel}>Country: </label>
40							<span>{selectedMarker.airport.country}</span>
41							<br />
42							<label className={classes.popupLabel}>Website: </label>
43							<Link
44								href={selectedMarker.airport.url === "" ? "#" : selectedMarker.airport.url}
45								target={selectedMarker.airport.url === "" ? null : "_blank"}
46								className={classes.popupWebUrl}
47							>
48								{selectedMarker.airport.url === "" ? "Nil" : selectedMarker.airport.url}
49							</Link>
50						</div>
51					</Popup>
52				) : null}
53			</Map>
54		</main>
55	);
56}
Conclusion
In this article, we created a map application in Next.js using the Mapbox API. We rendered the map and plotted the airport location with additional information using the popup.
You can add many features to the application and create fascinating map applications. We will explore these features in the upcoming articles. Until then, happy coding.
Thanks for reading this article. Don't forget to check out my other articles. You can support this article by sharing it.