
Notification toast or snack bar is a UI component that pop-ups to display information or status about ongoing processes or transactions. In any framework that supports React.js, we can use the in-built useContext() React hook to implement Notification pop-ups.
React useContext() hook is a mechanism for sharing a common piece of data (context value) among components at different levels of the DOM tree without passing props. It lets you read and subscribe to context from your component.
Working

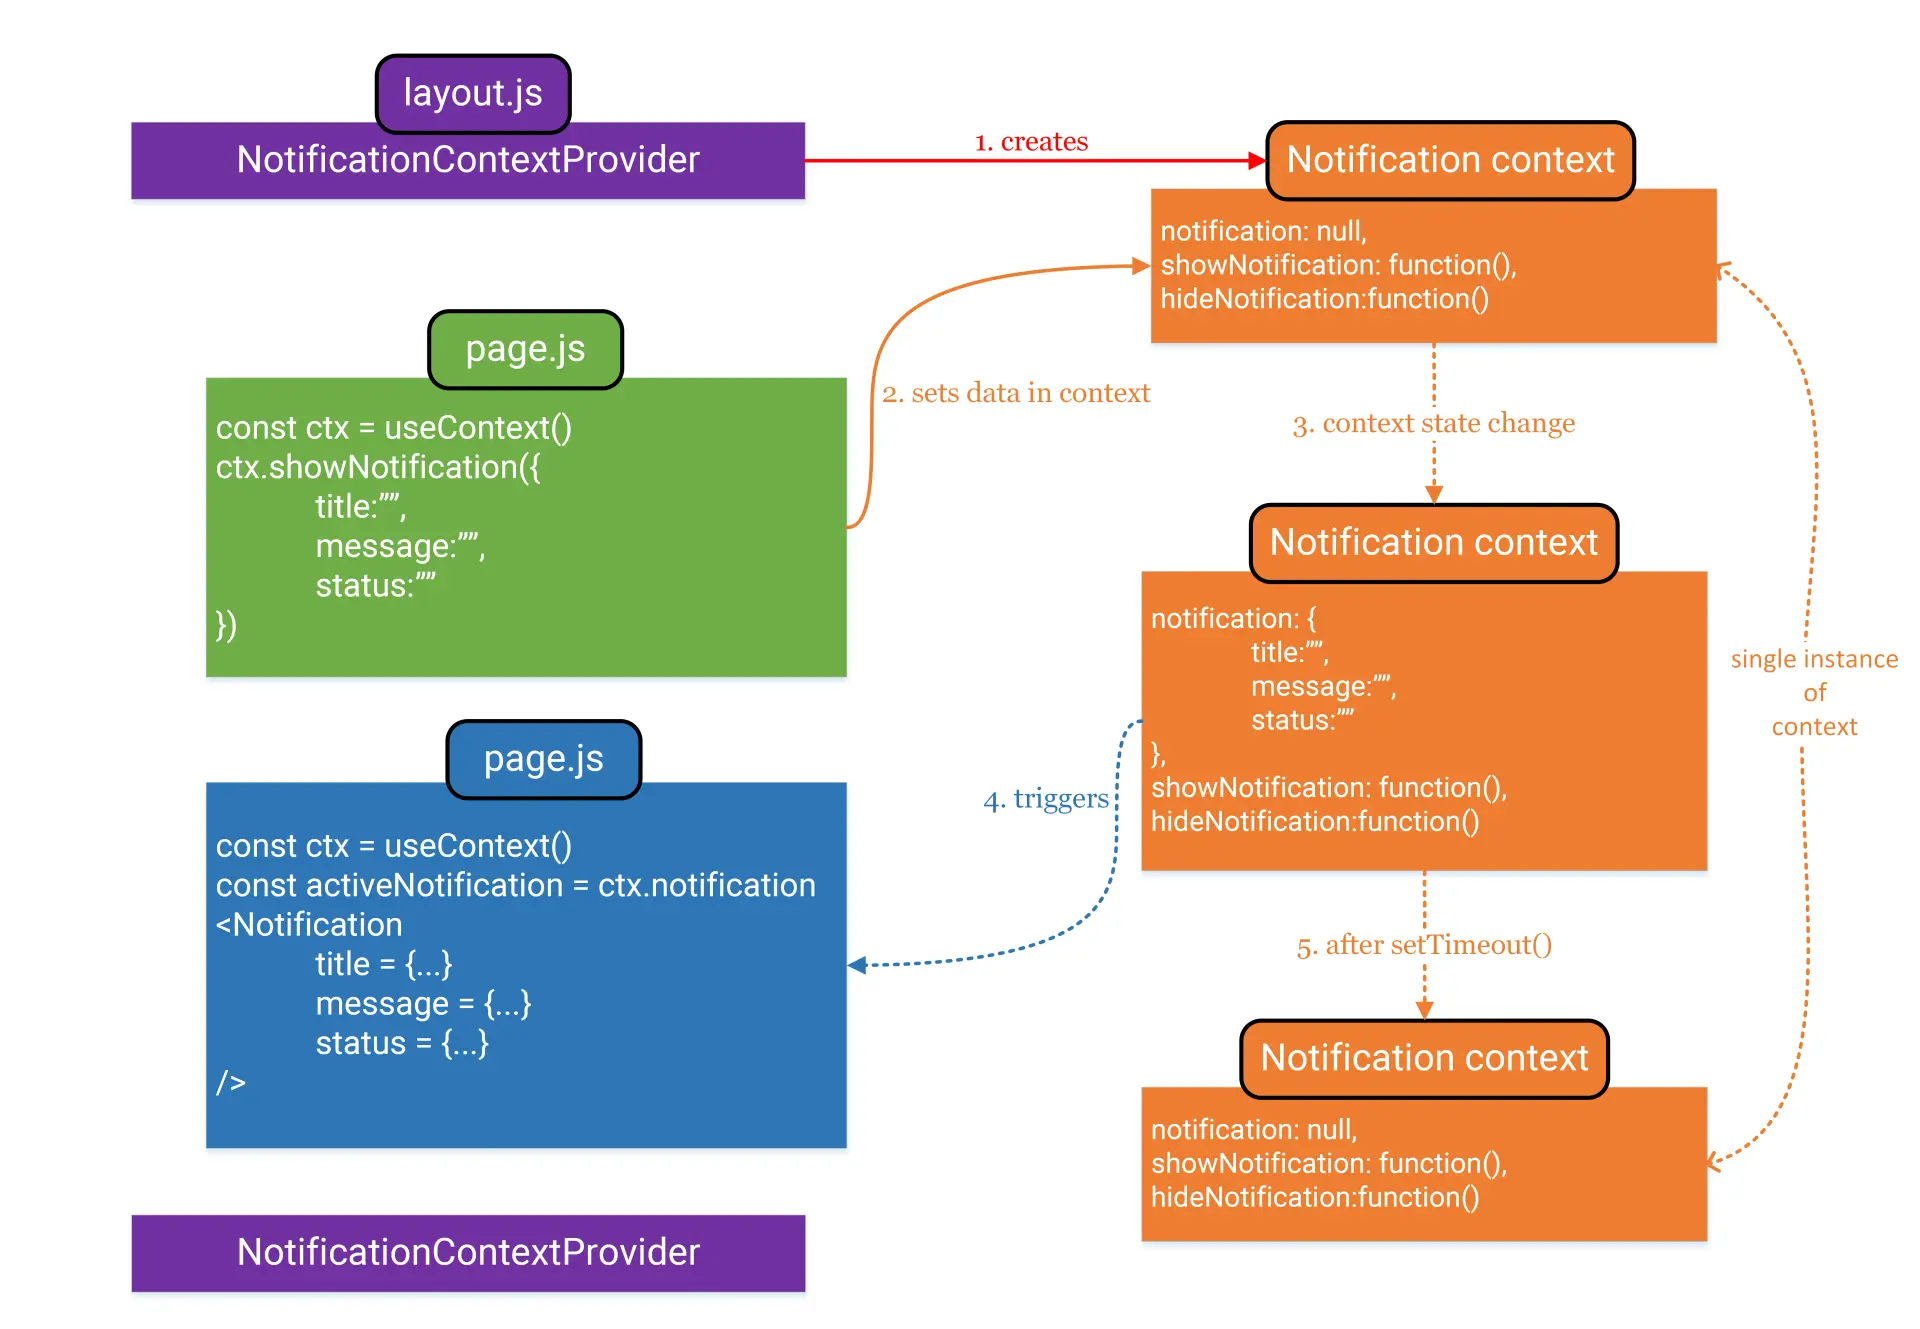
Before jumping into the code, let us understand what we are creating and how it will work. We will create a notification toast/pop-up to represent different states of a process like a form submission and API call status i.e. pending, success, and error. The below steps explain the general working of the notification pop-up:
- First, we will design a
NotificationContextProvider. It will define the general structure (data + methods) of a notification context. Our notification context will have the following structure:
1const context = {
2	notification: {
3		// initial value is null
4		title: "",
5		message: "",
6		status: "", // 'pending', 'success', 'error'
7	},
8	showNotification: function () {},
9	hideNotification: function () {},
10};
- Next, to make the notification context available to all the components, we will wrap the main app component with
<NotificationContextProvider>. Because we are using the Next.js version 13 with the App route, we will wrap thechildrenprops in the layout.js page. - Now, place your
<Notification>component where it can be shared by all the web pages, just like the header, and footer. For convenience, we will place it on the page.js page. - Finally, we use the methods from the notification context i.e.
showNotification()to populate the data for<Notification>pop-up. In the below example, we will use a button to trigger the notification pop-up. But in real-world examples, you can use it with a form submission handler.
Code
Setting up
In this example, we are using Next.js 13 along with the App router. For styling, we are using tailwind CSS. Our initial directory looks like this:
  app/
  ├─ favicon.ico
  ├─ globals.css
  ├─ layout.js
  ├─ page.js
  package-lock.json
  package.json
  ...other files and folder
Dependencies
We are using the react-icons for icons and classnames for conditional styling with tailwind CSS.
npm i react-icons
npm i classnames
Creating Context Provider
To create a notification context provider, create a ./store folder with a notification-context.js file. The createContext() will create a context with initial values and method declarations. In the next step, methods are implemented, and a context provider is exported. We have used the setTimeout() method to close the notification pop-up after a certain time.
1// ./store/notification-context.js
2"use client";
3import { createContext, useState, useEffect } from "react";
4
5const NotificationContext = createContext({
6	notification: null, //{title, message, status}
7	showNotification: function (notificationData) {},
8	hideNotification: function () {},
9});
10
11export function NotificationContextProvider(props) {
12	const [activeNotification, setActiveNotification] = useState();
13
14	useEffect(() => {
15		if (
16			activeNotification &&
17			(activeNotification.status === "success" || activeNotification.status === "error")
18		) {
19			const timer = setTimeout(() => {
20				setActiveNotification(null);
21			}, 4000);
22
23			return () => {
24				clearTimeout(timer);
25			};
26		}
27	}, [activeNotification]);
28
29	function showNotificationHandler(notificationData) {
30		setActiveNotification(notificationData);
31	}
32
33	function hideNotificationHandler() {
34		setActiveNotification(null);
35	}
36
37	const context = {
38		notification: activeNotification,
39		showNotification: showNotificationHandler,
40		hideNotification: hideNotificationHandler,
41	};
42
43	return (
44		<NotificationContext.Provider value={context}>{props.children}</NotificationContext.Provider>
45	);
46}
47
48export default NotificationContext;
Note:
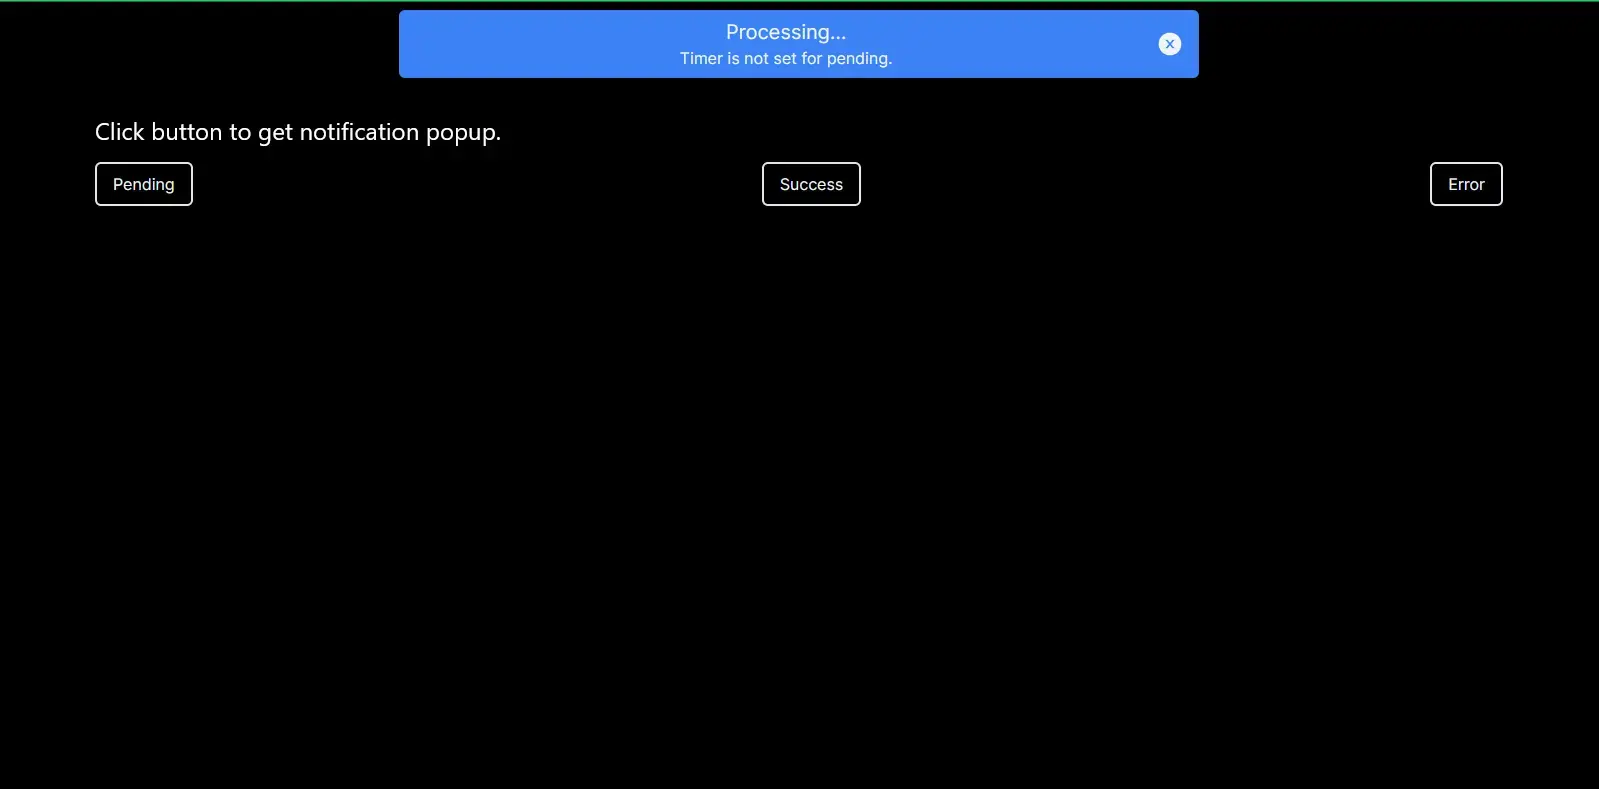
In the above code, setTimeout() is not used for status="pending". Instead, we can set the timeout for the HTTP call, which will throw an error if the response is not received from the server side before the timeout.
Creating UI for Notification
Now, create a Notification.js file in the ./components folder. This component will define notification UI for different states of the transaction. The events/responses of the transaction will populate the notification component.
1// ./components/Notification.js
2import { useContext } from "react";
3
4import classNames from "classnames";
5import { AiFillCloseCircle } from "react-icons/ai";
6import NotificationContext from "../../store/notification-context";
7
8function Notification(props) {
9	const notificationCtx = useContext(NotificationContext);
10
11	const { title, message, status } = props;
12
13	return (
14		<div
15			className={classNames(
16				"fixed w-2/4 left-2/4 -translate-x-2/4 top-0 mt-20 py-2 px-4 shadow-md rounded-md text-slate-100 flex flex-row justify-between items-center",
17				{ "bg-blue-500 shadow-blue-500": status === "pending" },
18				{ "bg-green-500 shadow-green-500": status === "success" },
19				{ "bg-red-500 shadow-red-500": status === "error" }
20			)}
21		>
22			<div className="flex flex-col items-center flex-[8]">
23				<h2 className="text-xl">{title}</h2>
24				<p>{message}</p>
25			</div>
26			<AiFillCloseCircle
27				size="26"
28				className="cursor-pointer"
29				onClick={notificationCtx.hideNotification}
30			/>
31		</div>
32	);
33}
34
35export default Notification;
Using Context Provider
As already mentioned, we are using Next.js 13 with the App router. So, we will wrap the children props with the <NotificationContextProvider> component in the layout.js page. If you are using other versions of the framework, try wrapping the main app component of the project with the context provider.
1// ./app/layout.js
2import "./globals.css";
3import { Inter } from "next/font/google";
4import { NotificationContextProvider } from "../store/notification-context";
5
6const inter = Inter({ subsets: ["latin"] });
7
8export const metadata = {
9	title: "Create Next App",
10	description: "Generated by create next app",
11};
12
13export default function RootLayout({ children }: { children: React.ReactNode }) {
14	return (
15		<html lang="en">
16			<body className={inter.className}>
17				<NotificationContextProvider>{children}</NotificationContextProvider>
18			</body>
19		</html>
20	);
21}
Placing Notification UI and Using Context
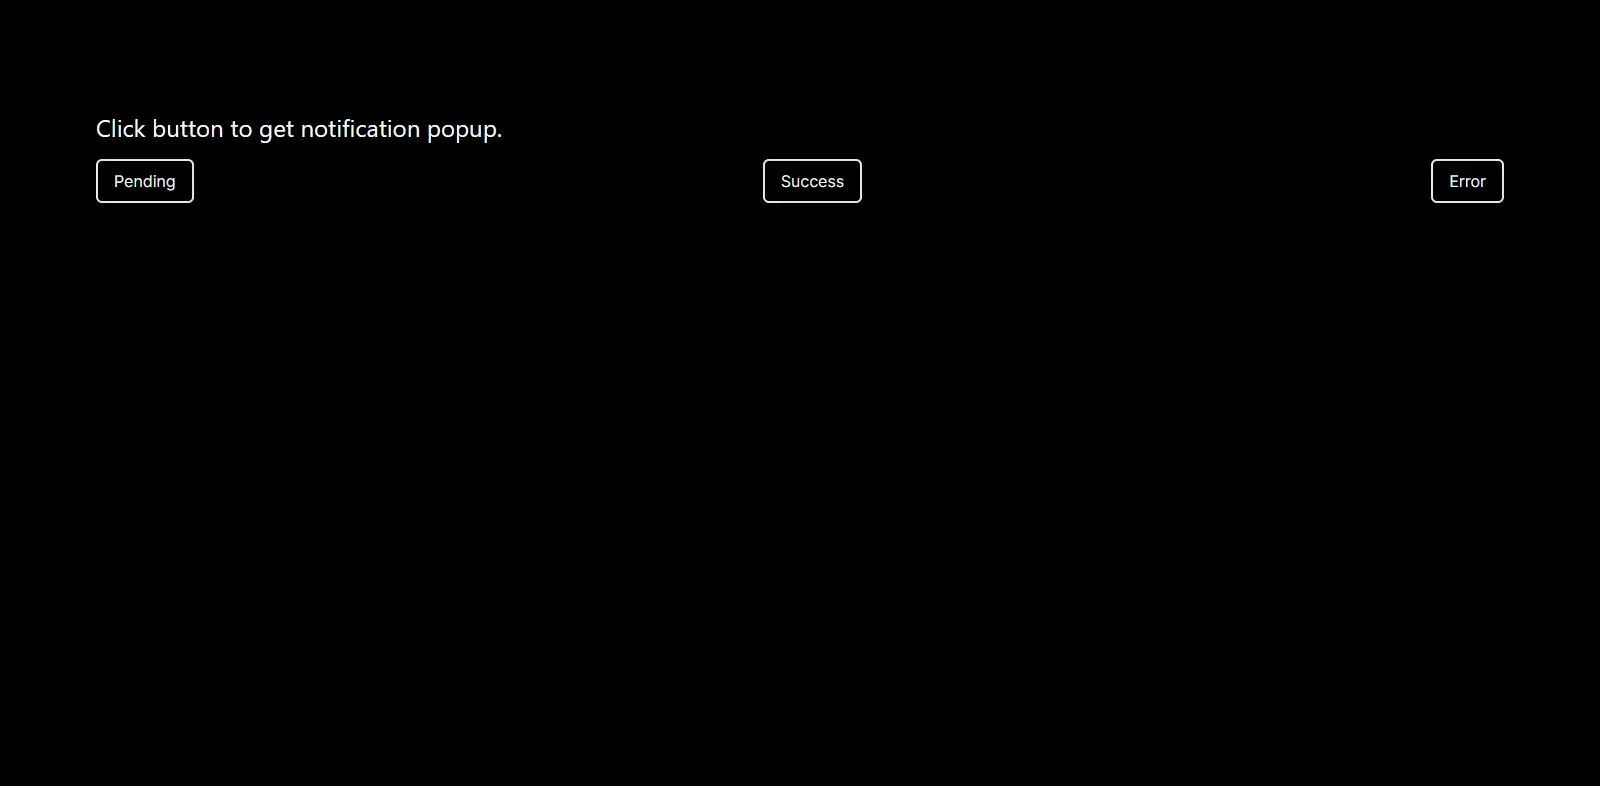
We will place the <Notification> component in the page.js file. It is a shared component and will remain hidden unless the condition meets. Then, we will add three buttons. Selecting each button mimics the different stages of a transaction (pending, success, and error). It changes the state of the notification context, which, in turn, pops the notification. A transaction can be a form submission, API call, etc.
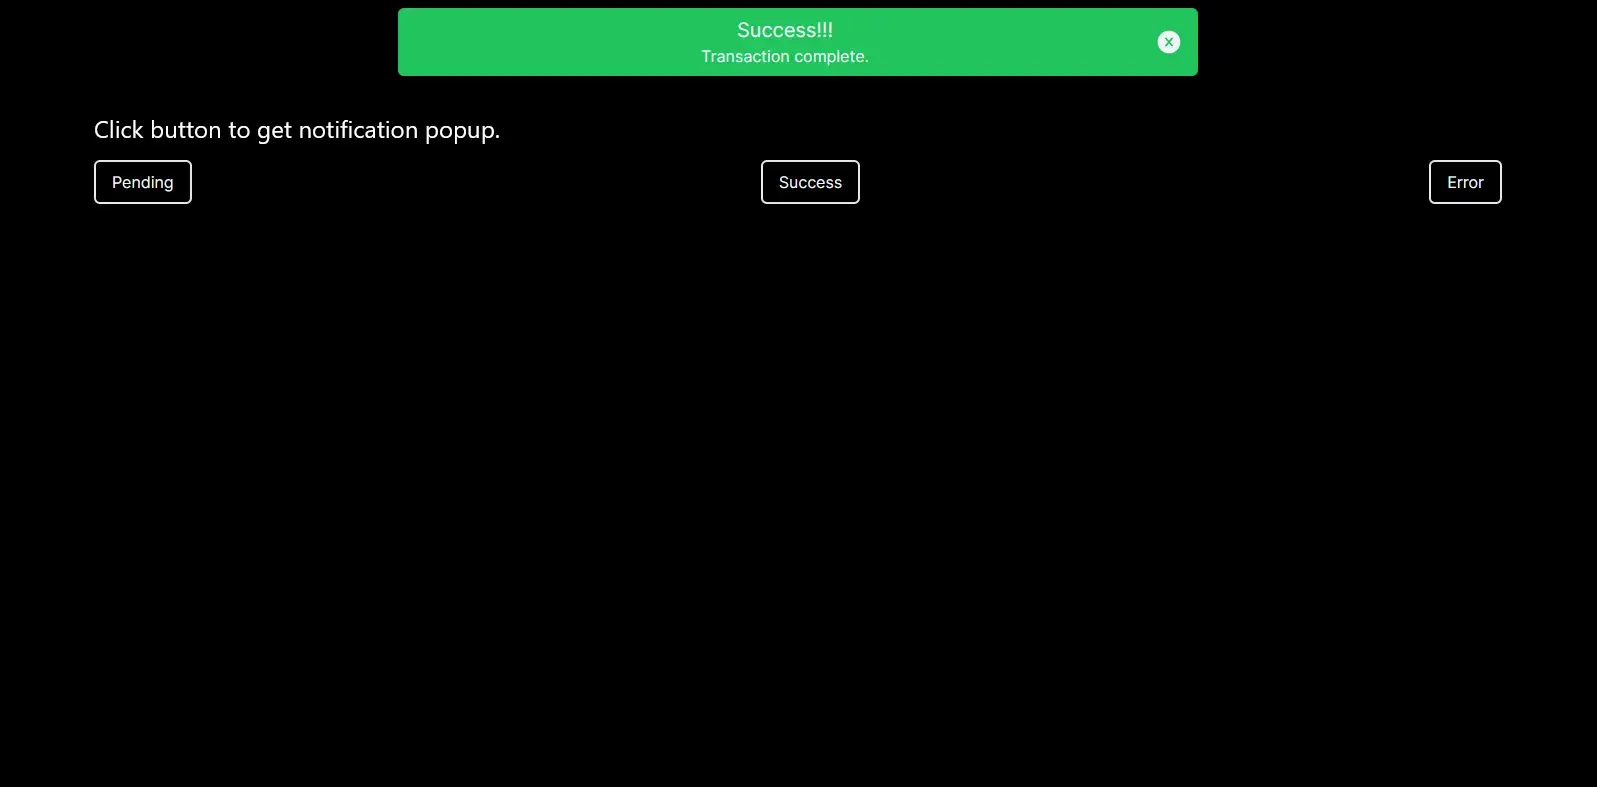
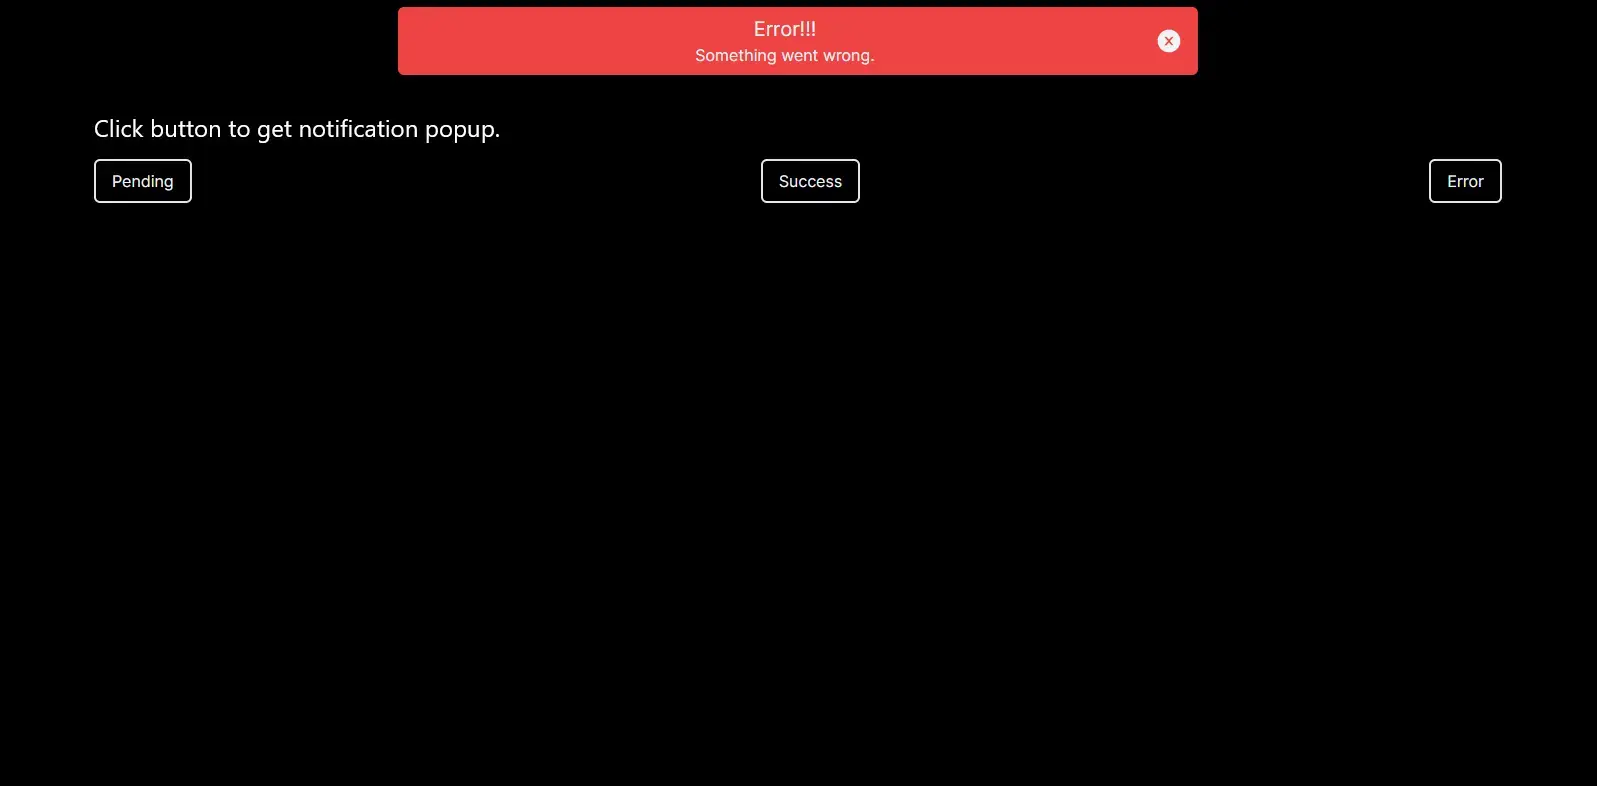
1"use client";
2//./app/page.js
3import { useContext } from "react";
4
5import NotificationContext from "../store/notification-context";
6import Notification from "../components/Notification";
7
8export default function Home() {
9	const notificationCtx = useContext(NotificationContext);
10	let activeNotification = null;
11
12	if (notificationCtx?.notification) {
13		activeNotification = notificationCtx.notification;
14	}
15
16	const buttonHandler = (status) => {
17		if (status === "pending") {
18			// Eg: After submitting form and waiting for response
19			notificationCtx.showNotification({
20				title: "Processing...",
21				message: "Timer is not set for pending.",
22				status: "pending",
23			});
24		} else if (status === "success") {
25			// Eg: After receiving response with status:200 (inside try of try-catch)
26			notificationCtx.showNotification({
27				title: "Success!!!",
28				message: "Transaction complete.",
29				status: "success",
30			});
31		} else if (status === "error") {
32			// Eg: After receiving error with status:400 or 500 (inside catch of try-catch)
33			notificationCtx.showNotification({
34				title: "Error!!!",
35				message: "Something went wrong.",
36				status: "error",
37			});
38		}
39	};
40
41	return (
42		<main className="flex min-h-screen flex-col p-24">
43			{activeNotification ? (
44				<Notification
45					title={activeNotification.title}
46					message={activeNotification.message}
47					status={activeNotification.status}
48				/>
49			) : null}
50			<div className="z-10 w-full max-w-5xl items-center justify-between font-sans lg:flex">
51				<h2 className="text-2xl my-4 text-center">Click button to get notification popup.</h2>
52			</div>
53			<div className="flex flex-row justify-between">
54				<button
55					onClick={() => buttonHandler("pending")}
56					className="border-2 py-2 px-4 rounded-md text-slate-100 hover:border-blue-500 hover:text-blue-500"
57				>
58					Pending
59				</button>
60				<button
61					onClick={() => buttonHandler("success")}
62					className="border-2 py-2 px-4 rounded-md text-slate-100 hover:border-green-500 hover:text-green-500"
63				>
64					Success
65				</button>
66				<button
67					onClick={() => buttonHandler("error")}
68					className="border-2 py-2 px-4 rounded-md text-slate-100 hover:border-red-500 hover:text-red-500"
69				>
70					Error
71				</button>
72			</div>
73		</main>
74	);
75}
Our final project structure looks like this:
  app/
  ├─ favicon.ico
  ├─ globals.css
  ├─ layout.js
  ├─ page.js
  components/
  ├─ Notification.js
  store/
  ├─ notification-context.js
  package-lock.json
  package.json
  ...other files and folder
Our resulting app looks like this:
Conclusion
In this article, we learned to use the useContext() React hook to develop a notification pop-up/toast/snack bar to represent different states of a transaction. We used buttons to mimic the events of the transaction. But, in your project, use it inside the form submit handler, try-catch block, API calls, etc.
Thanks for reading this article. Don't forget to check out my other articles. You can support this article by sharing it.