Table of content
- Prerequisites
- Initializing the map
- Necessary React states
- Add location function
- Remove location function
- What are the applications?
- Final code
- Styling
- Conclusion
Prerequisites
Before starting the article, let's see some of the prerequisites.
- We are using Mapbox as the map service provider. It provides 50,000 free map loads for the web (without billing credentials). So, create an access token for the Mapbox. You can refer to this article to learn how to create an access token.
- In this article, we are using Next.js 13 with App Router for project structure. So, you should have a Next project.
- Install the following dependencies react-map-gl, react-icons, and lodash. Run command to install:
npm install react-map-gl react-icons lodash --save - Store the access token in the environment variable. We had stored the env variable as
NEXT_PUBLIC_MAPBOX_ACCESS_TOKEN. You can learn more about the env variable in this section of the previous article.
Initializing the map
In the page.js file of the project, we will import the Map component from the react-map-gl package. The Map component will render the map. You can check the detailed explanation in this article. The final code is available in the below section. In this article, we will mainly focus on the logic behind the add and remove location function.
Necessary React states
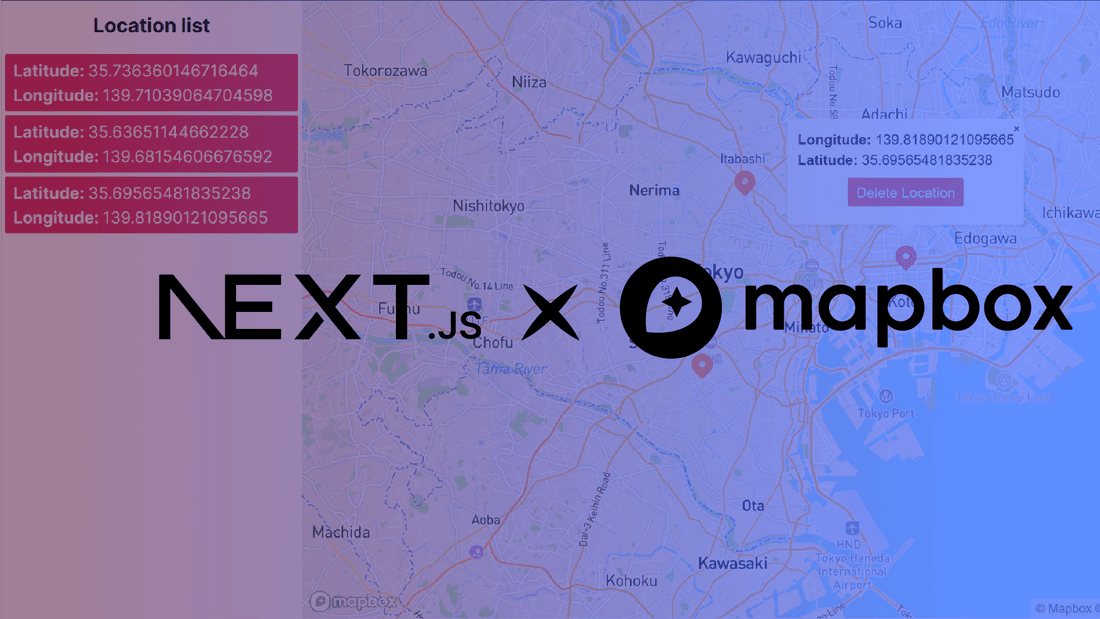
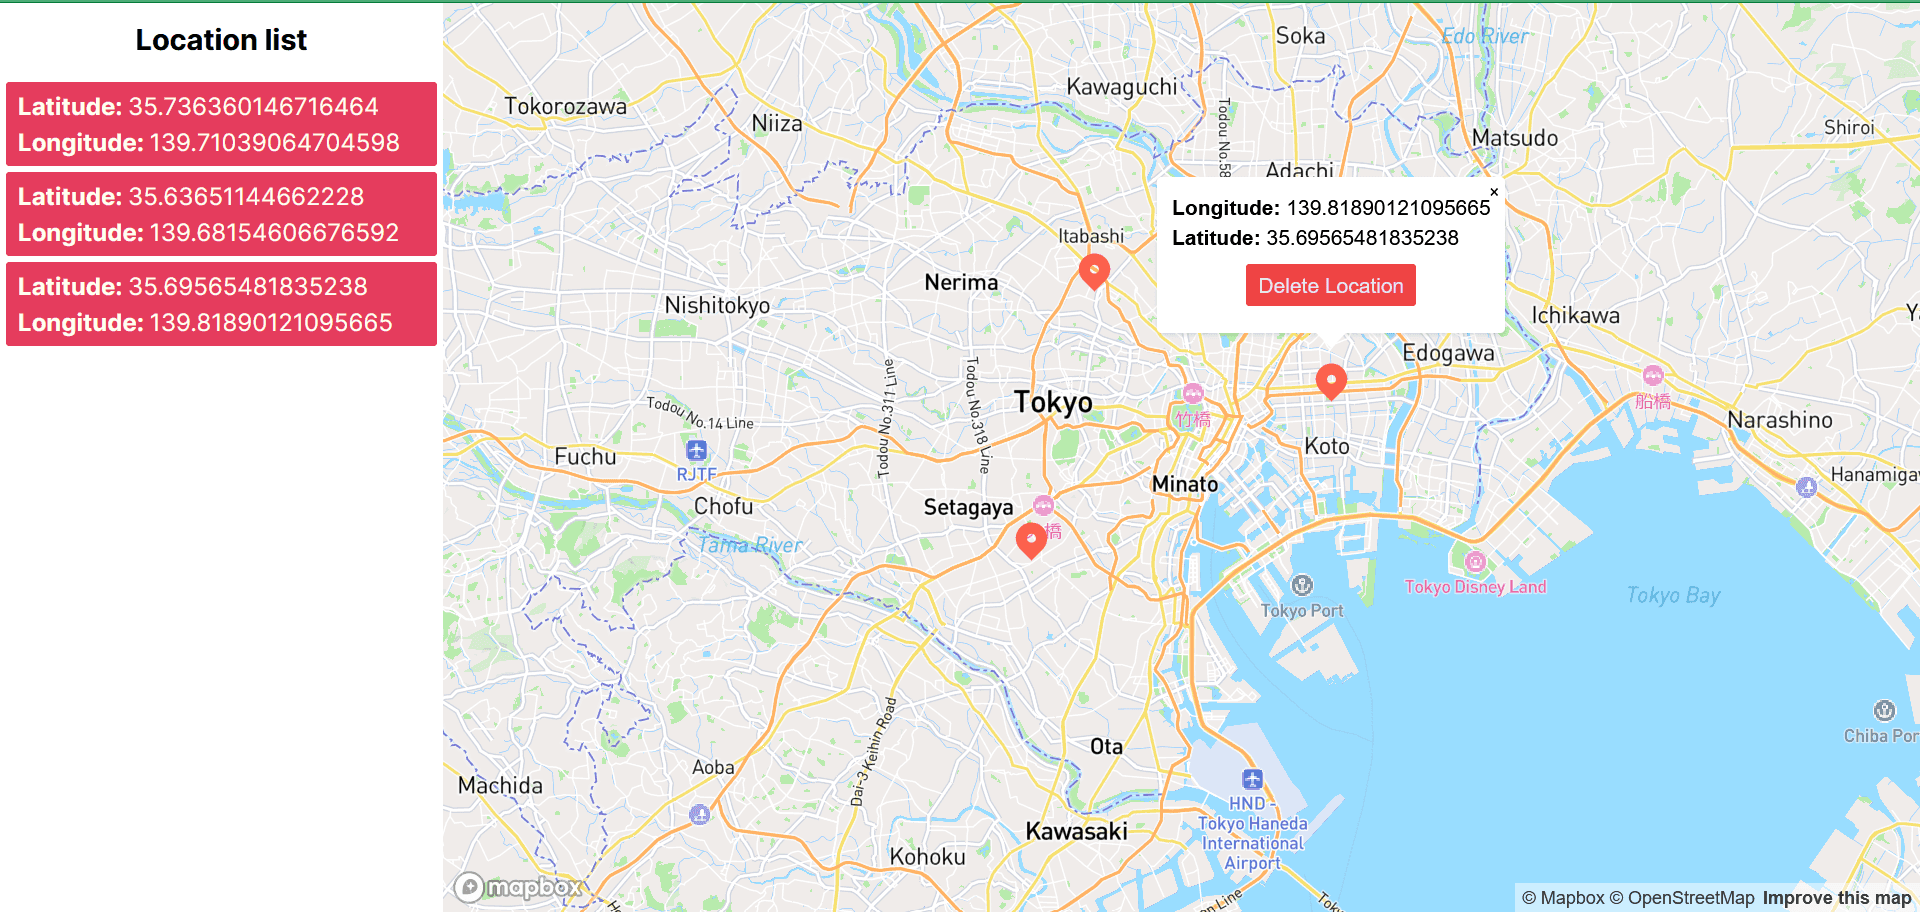
There are two main states in this illustration locs and selectedMarker.
locs: Thelocsstate is an array that will hold the locations (objects) you have created in the map. The location object consists of latitude and longitude.selectedMarker: TheselectedMarkerstate will keep track of the location marker you have selected from the map. A popup will appear when you select a location marker. The popup will have a delete button to remove the selected location from yourlocsarray.
Add location function
The addLocation function handles the onClick event of our <Map> component. In this illustration, we have limited the number of locations to three. Whenever there is an onClick event, the addLocation function will check the limit of the locs array. Then the clone function from the lodash library is used to shallow clone the array. Cloning is necessary to prevent any undesirable side effects of the state in React. After that, we will extract the longitude and latitude from the click event and use setLocs to set the locs state.
Note:
In our final code, we have rendered the list of created locations on the page sidebar.
1// page.js
2const addLocation = (e) => {
3	if (locs.length < 3) {
4		const temp = clone(locs);
5		temp.push({
6			latitude: e.lngLat.lat,
7			longitude: e.lngLat.lng,
8		});
9		setLocs(temp);
10	} else {
11		alert("No more than three locations");
12	}
13};
Remove location function
The removeLocation function will handle the onClick event of the delete button located at the popup of the selected location marker. The function will use the array index of the locs state to remove the selected location. For this purpose, we will use the Array.filter() function that returns a new array. The new array will then sets the locs state.
1// page.js
2const removeLocation = (removeIndex) => {
3	const temp = locs.filter((loc, index) => {
4		if (index !== removeIndex) {
5			return loc;
6		}
7	});
8	setSelectedMarker(null);
9	setLocs(temp);
10};
What are the applications?
The locs and selectedMarker can have multiple applications in your project. Here are some of the applications:
- User form: You can use the map in the user form to ask for the user's location. For example, on an e-commerce site you can ask user for pickup location of the parcel.
- Show locations: You can use the map to show, for example, store locations or any other custom data.
- Define areas: You can add locations to define geometric areas like circles, lines, and polygons. On the
locsstate, you can apply various algorithms or built-in functions to create aforementioned geometry.
Final code
In src/app/page.js add the following style:
1"use client";
2import { useState } from "react";
3
4import clone from "lodash/clone";
5import Map, { Marker, Popup } from "react-map-gl";
6import "mapbox-gl/dist/mapbox-gl.css";
7import { HiLocationMarker } from "react-icons/hi";
8import classes from "./Page.module.css";
9
10export default function Home() {
11	const mapboxToken = process.env.NEXT_PUBLIC_MAPBOX_ACCESS_TOKEN;
12	const [locs, setLocs] = useState([]);
13	const [selectedMarker, setSelectedMarker] = useState(null);
14
15	const addLocation = (e) => {
16		if (locs.length < 3) {
17			const temp = clone(locs);
18			temp.push({
19				latitude: e.lngLat.lat,
20				longitude: e.lngLat.lng,
21			});
22			setLocs(temp);
23		} else {
24			alert("No more than three locations");
25		}
26	};
27
28	const removeLocation = (removeIndex) => {
29		const temp = locs.filter((loc, index) => {
30			if (index !== removeIndex) {
31				return loc;
32			}
33		});
34		setSelectedMarker(null);
35		setLocs(temp);
36	};
37
38	return (
39		<main className={classes.mainStyle}>
40			<div className={classes.sideBar}>
41				<h3 className={classes.sideBarHeading}>Location list</h3>
42				{locs.length < 0
43					? null
44					: locs.map((loc) => {
45							return (
46								<div className={classes.listItem}>
47									<label className={classes.popupLabel}>Latitude: </label>
48									<span>{loc.latitude}</span>
49									<br />
50									<label className={classes.popupLabel}>Longitude: </label>
51									<span>{loc.longitude}</span>
52								</div>
53							);
54					  })}
55			</div>
56			<Map
57				mapboxAccessToken={mapboxToken}
58				mapStyle="mapbox://styles/mapbox/streets-v12"
59				style={classes.mapStyle}
60				initialViewState={{ latitude: 35.668641, longitude: 139.750567, zoom: 10 }}
61				onClick={(e) => addLocation(e)}
62				onMouseOver={(e) => (e.target.getCanvas().style.cursor = "crosshair")}
63			>
64				{locs.length > 0
65					? locs.map((loc, index) => {
66							return (
67								<Marker key={index} latitude={loc.latitude} longitude={loc.longitude}>
68									<button
69										className="bg-transparent border-none cursor-pointer"
70										onClick={(e) => {
71											e.stopPropagation();
72											setSelectedMarker({ loc: loc, index: index });
73										}}
74										type="button"
75									>
76										{<HiLocationMarker size={30} color="tomato" />}
77									</button>
78								</Marker>
79							);
80					  })
81					: null}
82				{selectedMarker ? (
83					<Popup
84						offset={25}
85						latitude={selectedMarker.loc.latitude}
86						longitude={selectedMarker.loc.longitude}
87						onClose={() => {
88							setSelectedMarker(null);
89						}}
90					>
91						<div className={classes.popupInfo}>
92							<label className={classes.popupLabel}>Longitude: </label>
93							<span>{selectedMarker.loc.longitude}</span>
94							<br />
95							<label className={classes.popupLabel}>Latitude: </label>
96							<span>{selectedMarker.loc.latitude}</span>
97							<div className={classes.deleteBtnContainer}>
98								<button
99									className={classes.deleteBtn}
100									type="button"
101									onClick={() => {
102										removeLocation(selectedMarker.index);
103									}}
104								>
105									Delete Location
106								</button>
107							</div>
108						</div>
109					</Popup>
110				) : null}
111			</Map>
112		</main>
113	);
114}
Styling
In src/app/globals.css add the following style:
1/* globals.css */
2body {
3	font-family: Arial, Helvetica, sans-serif;
4}
5.mapboxgl-popup-content {
6	padding: 0 !important;
7}
Create a src/app/Page.module.css file and add the style for map components:
1/* Page.module.css */
2.mainStyle {
3	max-width: 100%;
4	height: 100vh;
5	display: flex;
6}
7.sideBar {
8	width: 30%;
9}
10.sideBarHeading {
11	padding: 10px;
12	font-weight: bold;
13	font-size: larger;
14	text-align: center;
15}
16.listItem {
17	background-color: #e43c5d;
18	padding-top: 0.25rem;
19	padding-bottom: 0.25rem;
20	padding-left: 0.5rem;
21	padding-right: 0.5rem;
22	border-radius: 0.125rem;
23	margin: 4px;
24	color: ivory;
25}
26.mapStyle {
27	width: 70%;
28	height: 100%;
29}
30.popupInfo {
31	font-weight: 400;
32	font-size: 14px;
33	padding: 10px;
34}
35.popupLabel {
36	font-weight: bold;
37}
38.deleteBtnContainer {
39	display: flex;
40	justify-content: center;
41	width: 100%;
42	padding-top: 0.5rem;
43	padding-bottom: 0.5rem;
44}
45.deleteBtn {
46	background-color: #ef4444;
47	padding-top: 0.25rem;
48	padding-bottom: 0.25rem;
49	padding-left: 0.5rem;
50	padding-right: 0.5rem;
51	margin-top: auto;
52	margin-bottom: auto;
53	border-radius: 0.125rem;
54	color: #e2e8f0;
55}
Our project structure will look like this:
  src
  ├─ app/
  │  ├─ globals.css
  │  ├─ layout.js
  │  ├─ page.js
  │  ├─ Page.module.css
  package-lock.json
  package.json

Conclusion
In this article, we learned to add and remove locations on the map provided by Mapbox and discussed possible applications of this functionality.
Thanks for reading this article. Don't forget to check out my other articles. You can support this article by sharing it.